Monday, September 28, 2009

Make & Take Monday

This cute little container is called Box in a Bag.
Photobucket

You will need:

5" x 11" Designer Paper

1" x 11" Coordinating Cardstock

4 1/2" x 4 1/2" Coordinating Cardstock
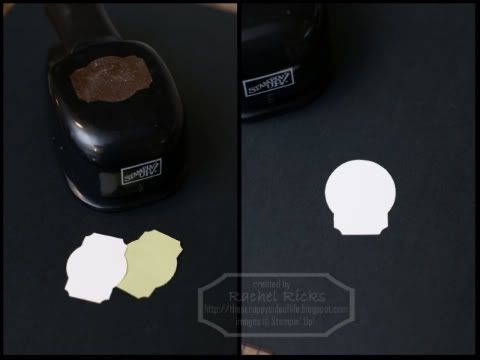
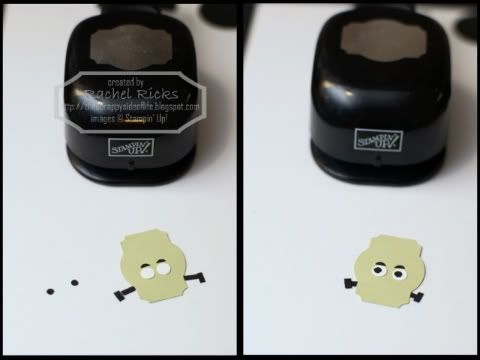
Round Tab Punch

Scallop Punch

Scoring tool

Adhesive

¼” hand held circle punch

Embellishments

Glue Dots
-------------------------------------------------------------------------------------

Step 1
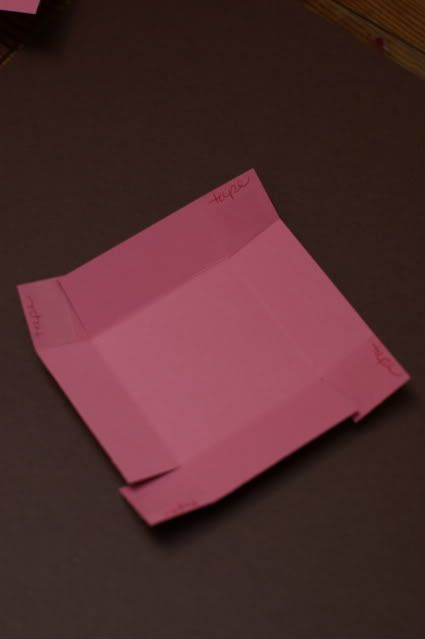
Cut your cardstock to 4 ½” x 4 ½”

Step 2
Score 1” on all four edges.

Step 3
Following the score line cut a one inch square tab and add tape to each square.
Photobucket

Photobucket

Step 4
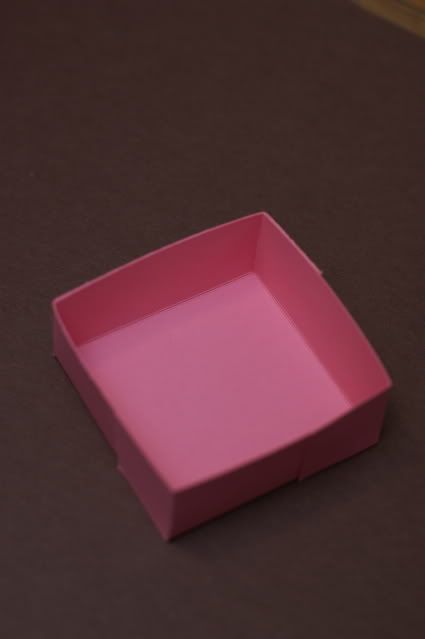
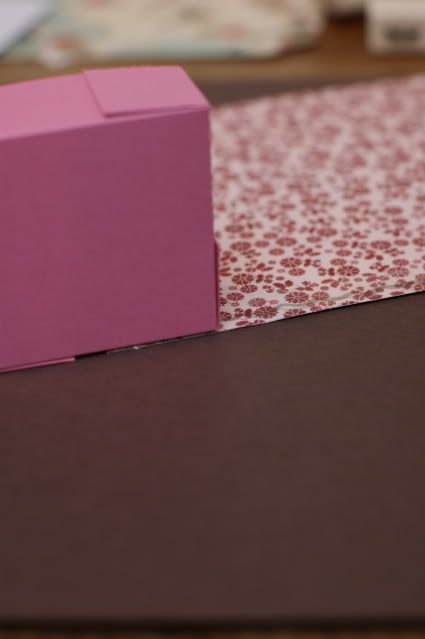
Stick down the flaps to create a box.
Photobucket

Step 5
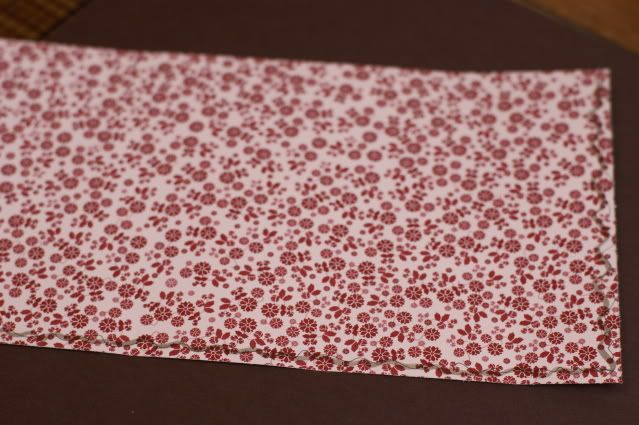
Cut your Designer Paper to 5” x 11”.

Step 6
Add tape along the bottom and up one side of the back of the Designer Paper.
In the photo I marked with pen where to add tape along the edge.
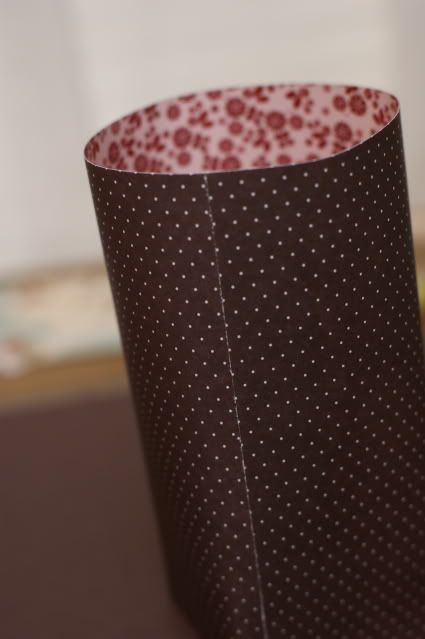
Photobucket

Step 7
Lay your box along the bottom edge of the background paper so they are even with each other. Wrap Designer Paper around the box.
Photobucket

Step 8
Continue to wrap the box with the paper, keeping the edges of the paper and the box even.

Step 9
When you come to the end piece, tape the two ends together carefully bringing your edges together on the bottom, and also up the side of the bag.
Photobucket

Step 10
Now cut paper into an 11" x 1" strip.
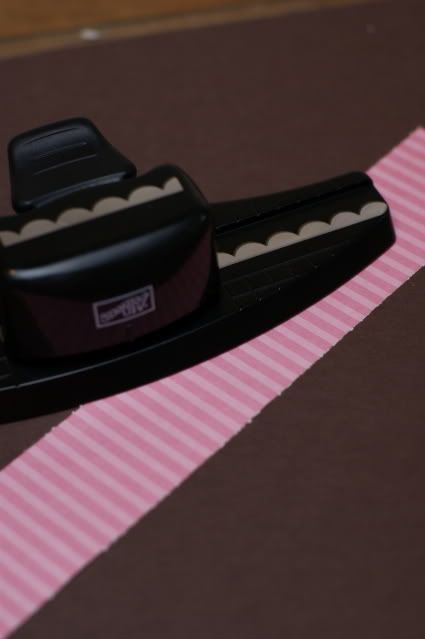
Photobucket

Step 11
Scallop punch the entire length of cardstock. Then adhere the strip along the bottom of the bag.
Photobucket

Step 12
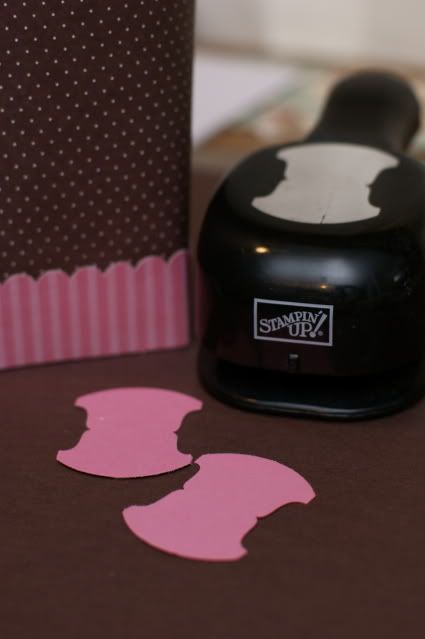
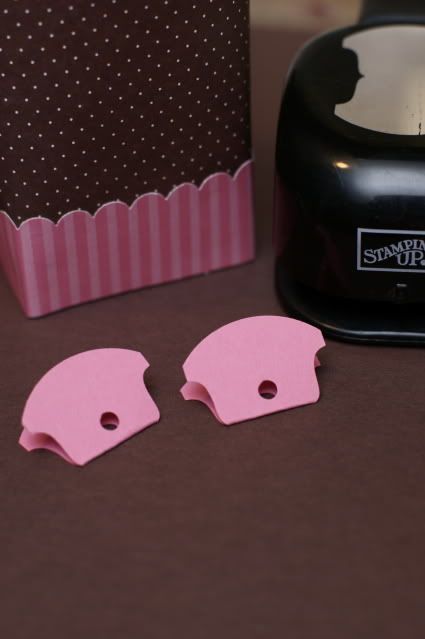
Punch out 2 Round Tab punches, fold in half and punch a ¼” circle in them.
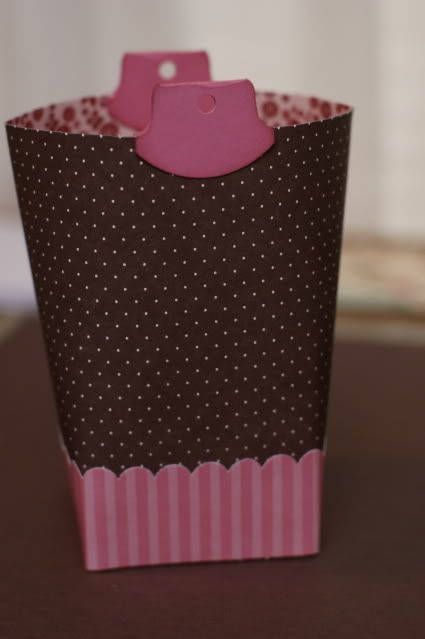
Photobucket
Photobucket

Step 13
Glue a tab on the front and the back of the bag, this will be the bag closure.
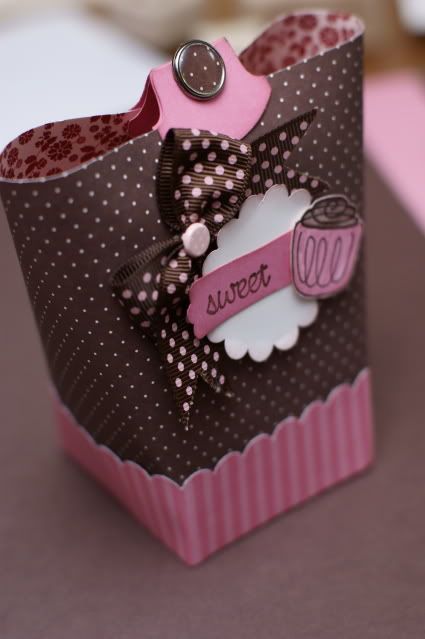
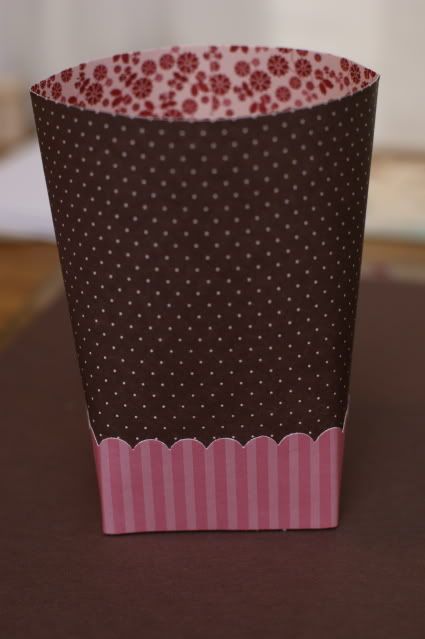
Photobucket

Step 14
Decorate!
Photobucket

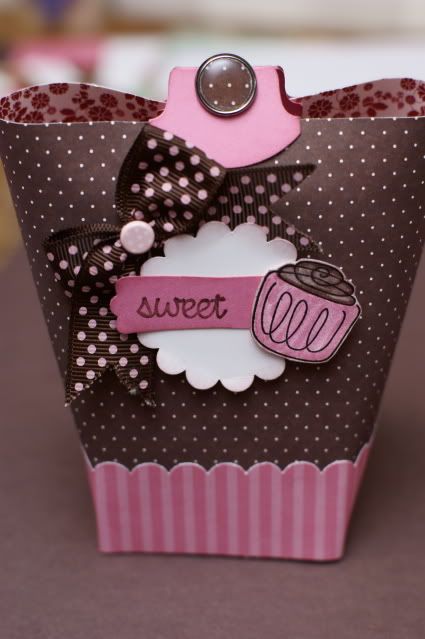
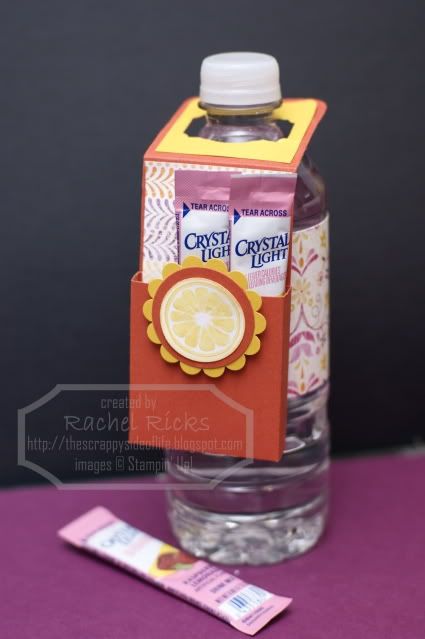
I used the Scallop Circle punch, the new Modern Label punch, the cupcake stamp from the hostess set in the last catalog, the sweet sentiment from a sale-a-bration set years ago, ribbon, and brads.

You can use ribbon to tie your Box in a Bag closed or you can use a brad like I did here. Since I had used ribbon on the front I decided to keep my Box on a Bag closed using a Build-a-brad designed to match perfectly!

Hope you enjoyed the Make and Take today. I'm sure there are typos and mistakes so if you have questions, please ask, I'm happy to help.

Hope you have a wonderful week!

Friday, September 25, 2009

Cute Cards and a Cute Case, Too!

Photobucket

I'm not usually a card maker but when I saw something similar to this by Lauren Meader I had to try it with Stampin' Up stamps from the Cheep Talk stamp set(#113204) and I have to say I am really excited at how well it turned out!

Photobucket

Photobucket

I made a matching card case to hold a set of cards and envelopes. A perfect card set to write a quick note for any occasion. I think this card set would also make a nice gift. So, that being said, who wants to win this card set? All you have to do is leave a comment to enter in a drawing for a chance to win a set of 5 cards tucked inside the cute card case!

Photobucket

I used Melon Mambo textured cardstock, Whisper White cardstock, and Certainly Celery cardstock. I also used Melon Mambo and Certainly Celery ink. In the center of the flower on the card case I used a Kiwi Kiss corduroy brad.

Sometime very soon I will be offering templates, such as the card case, for a low price. Something you can purchase once and use again and again!

Don't forget to leave a comment for your chance to win the card set! You have until next Friday morning, then I'll post the winner of the drawing that evening.

Have a wonderful weekend!

Tuesday, September 22, 2009

Scrappin' Fool

I was a scrappin' fool this weekend thanks to a virtual crop hosted by some online friends. I had a blast chatting, playing games, and seeing everyone's work! I haven't had the time to scrapbook lately so it was nice to get elbow deep in my supplies and actually creating pages again. I'll start by sharing the first page I've created in months!

Photobucket

The kids had fun celebrating National S'mores Day this year. It just happened to fall on the first day of school so it was nice to have a special treat that evening.

Paper:
The yellow scalloped rectangle is from a new paper pack from Stampin' Up called The Write Stuff (115674). This pack includes journaling die cuts! LOVE it!!
I also used Sweet Slumber paper (which is no longer available), Chocolate Chip cardstock, Baja Blue cardstock, and Riding Hood Red cardstock.

Photobucket

Stamps:
The "Yummy" stamp is from the set which you could only receive during the Sale-a-bration ealier this year.
The s'more is from the set Under the Stars (111556).

Photobucket

Die Cuts:
I used my mostest favorite die from Stampin' Up, the Top Note Die (113463).

Thanks for stopping in and taking a look. I'll be sharing more pages soon.

Hope you are enjoying your Tuesday.

Monday, September 21, 2009

Make & Take Monday

With Halloween right around the corner I thought it would be fun to share how to make 2 cute frightful friends. You could use these on cards, as scrapbook embellishments, as tags on treat bags, any Halloween craft.
Photobucket
You will need the Designer Label Punch (107590). I also used the Heart to Heart Punch (113694), 1/4" circle punch, and 1/8th" circle punch. Cardstock, I used black, white, and green. A fine tip black pen.
We will start with the skull. He's so easy to make, it's scary! Haha.
First punch a Designer Label out of white cardstock, then trim off one end following the curve of the circle. Tip: I punched a circle and matched it up with the circle part of the Designer Label punch and traced it on the back so it was easier to cut.
Photobucket
Next punch a small heart in black using the Heart to Heart Punch. Cut the heart in half and attach upside down and separated a bit to the Designer Label punch creating eye sockets for your skull. (Don't have the Heart to Heart punch yet...you can cut 2 small raindrop shapes to use as eyes) Next I simply drew on nose holes and teeth lines to finish my skull. See, super easy.
Photobucket
Now on to Mr. Frankenstein.
First punch a Designer Label out of green cardstock. Then cut small thin rectangles out of black cardstock. I don't have exact measurements for these, just what you think looks good. These are the bolts.
Photobucket
Next punch the smallest heart using the Heart to Heart punch out of black cardstock, then trim off the two humps. These will be the eyebrows.
Photobucket
Punch in white cardstock two 1/4" circles. Punch two 1/8" circles out of black cardstock. Place the "eyebrows" on the Designer Label, then place the white circles below the "eyebrows" and the small black circles on top of the white to create eyes. Tip: I used liquid glue, it is easier to use on such small pieces.
Photobucket
Now punch another Designer Label out of black cardstock and trim it right above the eyes on Franky. Then cut zigzag fringe for his hair and attach. Draw on a mouth and your done.
Photobucket
Hope you enjoy these 2 frightful friends. If you use these I'd love to see what you create. Add a link to a photo of your creation in the comments so we can all be inspired by each other's work.
I was able to participate in an online crop this weekend and I was able to finish quite a few scrapbook pages. I'll be sharing those with you throughout the week.
Hope you having a wonderful Monday.

Friday, September 18, 2009

Room Redo...

Over the last month we've been reorganizing almost every room in our home Clean Sweep style. Lots of purging and reorganizing. I have really enjoyed "spring" cleaning even though it is already fall. Rearraging the kids rooms left furniture that I didn't want to get rid of and didn't have room to store so I was left with finding a place for it all. Well, it ended up in my crafting spot and I love it. I have more storage room and things look and feel more organized.
Photobucket
You can check out my old space {here}
I was excited to be able to still use the hanging jars. My sweet husband simply unscrewed them from the bottom of the white shelves and attached them under the shelf on the desk. Perfect!

In other news...the holiday mini catalog is out and full of great new products! You can download the catalog by clicking {here}

I just recieved this new set from the mini catalog
Photobucket
and can't wait to create something and share it with you.

I hope everyone has a wonderful weekend!

Monday, September 14, 2009

August Stamp Club Creations

During our August Stamp Club we made these bottle hangers perfect for holding the on the go drink mixes or any other little treat.

Photobucket

I also wanted to show my club girls other fun ways to use the same idea. So I brought these examples.

Spa Gift Pack

Photobucket

I always have such a hard time shopping for my preteen daughter's friends birthday and I think this would be perfect!


Coloring Book and Crayon Set

Photobucket

You could also use word search books or a magazine and include other goodies in the pocket. What a great "get well" or "thinking of you" gift. A lady at the club meeting thought they would make great goody bags for a childs party. How fun!

We also made a basket and a few strawberry boxes.

Photobucket

Photobucket

We will be meeting for our next club meeting soon. This month is all about jewelry!

Make and Take Monday should start up again next Monday. My scrap space (and my children's bedrooms) had a makeover so I haven't been able to post but for the most part things are done and life can get back to normal.

LinkWithin

Related Posts with Thumbnails
Disclaimer: The content in this blog is the sole responsibility of Rachel Ricks as an independent Stampin' Up! demonstrator and the use of and content of classes, services or products offered is not endorsed by Stampin' Up!

All content, including text, photographs, and concept design works, are ©Rachel Ricks. They are shared for personal/ non-commercial use and inspiration only.

Blog header and logo design © Rachel Ricks.

flash backs