Friday, August 24, 2012

Wonderfall Bushel Basket

Another awesome UStamp with Dawn and Friends event has started!! The event is called Heating Up the Holidays! We will be sharing over 40 projects featuring all the holidays coming up...Thanksgiving, Halloween, Christmas! I'm excited for the holidays!!
Here's my project...


If you'd like to join the event and receive this tutorial and over 40 other tutorials click here > Heating Up the Holidays! 

Thanks for dropping by!!

Photobucket

Thursday, July 12, 2012

Baby Bouquet

As my second project for KEEP CALM and USTAMP ON event I decided to make a fun baby bouquet. With 3 girls and 1 boy around here, we are hoping for a baby boy, so I HAD to make my project all boy!!
You could easily change it up for a baby girl or a birthday or whatever occasion! I hope you'll join us for KEEP CALM and USTAMP ON!

Photobucket

Tuesday, July 10, 2012

Some Exciting News and a "Berry" Cute Box

First I'll share the exciting news since it is the reason I haven't posted anything on my blog in such a long time.
Surprise!! We are welcoming another sweet little miracle into our family!
I've been super sick with this pregnancy so I haven't been on the computer or in the little blue room very often lately.

But, I do have a fun project to share with you from the current UStamp with Dawn and Friends event! A "berry" cute box perfect for summer time gift giving! 

If you'd like to join us at the UStamp Event and receive the tutorial for this project and over 40 other projects click here> KEEP CALM and USTAMP ON!

I have another project to share for the UStamp event later this month!!

Thanks for dropping by the little blue room!


Photobucket

Wednesday, May 23, 2012

Scrapbooking Blog Hop - UStamp With Dawn and Friends


Welcome to the UStamp with Dawn and Friends!! 3rd Anniversary Celebration Edition 2012 World Showcase Blog Hop.
 

If you have been following the Blog Hop from the beginning, you have just checked out Melissa Stout's awesome 12x12 layout. Didn't you just love that she put it on canvas?? Melissa is called the Stamp Doc for a reason. She really knows her stuff and is a FABULOUS Designer! She always creates something AMAZING for UStamp with Dawn and Friends!! events!!
 

If you are just joining the Blog Hop, no problem, you can start at any point. All the Designer's Blogs are linked together so you will be able to see ALL the FANTASTIC projects we have for you.

Scrapbooking is my FAVORITE paper craft, my first love! I enjoy giving albums as gifts and creating them with my stamp club group. The only problem, I never know how many photo spots to include or if they are using horizontal or vertical photos. With the type of mini album I designed it is easy to create as a gift or with a group. Since you are just making the covers and title page tags there is so much freedom and versatility for how many photos you can include and horizontal and vertical are no longer a problem!

Here's a peek at a few of the title page tags inside the album!


I used around 100 wallet size photos in mine! 
When my husband saw it he said, "I thought this was a MINI album!" I replied, "A mini album that can tell the WHOLE story!" I wanted something that wasn't going to limit the memories I could include and this turned out perfectly! I hope you enjoy!
 

As a Special Thank You for stopping by my blog I am giving away BLOG CANDY!!
Please leave a comment about my project to be entered for a chance to win a dynomite prize of 12 inches of ALL the BRAND NEW Stampin' Up! RIBBONS!! These NEW Ribbons will be available as part of the NEW Stampin' Up! 2012-2013 Catalog!! I will randomly select a winner to be announced on Tuesday, May 29th so please check back to see if you are the lucky recipient!
 

AND there's MORE...LOTS MORE!!
 

  • You have the opportunity to get the downloadable PDF Tutorial for my project FREE!! It's a GIFT from UStamp with Dawn and Friends!! Woohoo!!
  • Click below to access the FREE BLOG to get your FREE PDF Download.


The FAB Projects, FUN and Friendship continues
AFTER the Blog Hop ends!!

SAVE $$$ and JOIN US NOW for
the Early Bird Pricing for "KEEP CALM AND USTAMP ON"!! Inspired by the upcoming
2012 Summer Olympic Games in London,
the BEST of the BEST Designers
are coming together to showcase their
Gold Medal worthy talents for YOU!!
Here is what you can expect....
40+ WORLD CLASS PROJECTS
created with
BRAND SPANKY NEW
Stampin' Up! Products from the 2012-2013 catalog will
WOW, INSPIRE and EXCITE YOU!!
20 days of creative fun for EVERYONE!!
NEW Project posted every 12 hours!!
TONS of Bonus Projects!!
FREE PDFS for every project, LIVE Designer Hosted Chats, Prizes, Member Photo Gallery and so much MORE!!
UStamp with Dawn and Friends!! is
THE BEST VALUE on the planet!!
Early Bird Pricing of ONLY $19.99 ends Friday June 1st
First Project Posted on Opening Day: Jun 22nd
Last Project Posted: July 11th
Click the blinkie below to $AVE and SIGN UP TODAY!!
KeepCalmBlinkie
Ready to get hopping again??!!
Of course YOU are!!
Click below to check out what 
FABULOUSNESS
Betty Traciak has waiting for YOU on her blog to share!!  

If you would like to hop back to Melissa's Blog, please click below
Thanks again for the opportunity to share
my creativity with you!!


Photobucket

Friday, February 10, 2012

Valentine Heart Box

Another awesome Ustamp with Dawn and Friends event just started!! I'm super excited about an event all about using the BIG SHOT die cut machine!! It's the most used tool in my craft room! 
Here's my first project!
 Giving a box of chocolates to your Valentine is even sweeter when you hand-make the heart shaped box yourself! Join us for the Big Shot Roundup Event to get the PDF tutorial of this box, plus over 40 more awesome project tutorials!! All for just $24.99!! Click here > Big Shot Roundup < to sign up. Hope to see you there!!
Here's my box filled with homemade mint chocolate truffles. YUM! 


Thanks for stopping by for a visit at the little blue room! Happy crafting!


Photobucket

Thursday, January 12, 2012

Spring Chandelier

I'm so excited that I get to share another project I created for the UStamp with Dawn and Friends online class. A spring chandelier!


To learn how to make this spring chandelier join the UStamp with Dawn and Friends event going on now to downlaod the step by step tutorial!

Along with the tutorial for the chandelier you'll find 40 projects with tutorials all using the awesome new Simply Scored tool from Stampin Up! All for just $24.99. What a deal! Hope to see you at the event!

Photobucket

Saturday, December 31, 2011

Have Your Cake and Eat It, Too!

Happy New Year's Eve! I hope everyone has a fun and safe night welcoming in the new year!
I'm excited to start the year off sharing a neat project I created for the UStamp with Dawn and Friends online class going on right now!

With this cupcake kit you can Have Your Cake and Eat It, Too! In the tutorial I tell you step-by-step how to create this gift box which includes a cupcake-in-a-jar, sprinkles, and icing.

To get this tutorial and many, many more join us for the UStamp with Dawn and Friends SCORE event. 
During the Score Event the UStamp with Dawn and Friends designers will share 40+ projects with tutorials for every project all using the new Stampin' Up! Simply Scored tool! Also, live chat and prizes! It's always lots of fun!! Click here to go sign up! Only $24.99! 

Thanks for stopping by!

Photobucket

Monday, November 21, 2011

Christmas Wishes

Nope, it's not another Christmas card. This week I made a cute little Christmas gift box.

The challenge this week at Hand Stamped Sentiments is Winter Wonderland. Which is why I was inspired to use the snowflake die cut on my project this week. Isn't it cute with the button in the middle and the baker's twine bow?
Looking forward to seeing what this challenge inspires you to create! Head over to Hand Stamped Sentiments to check out the cool projects the other designers shared this week.

Now I'm off to get everything ready for family and friends to come celebrate Thanksgiving at our house. Hope everyone has a wonderful Thanksgiving filled with love and many happy blessings!

Photobucket

Tuesday, October 25, 2011

Corny

I can't believe Halloween it's just a few days away! Fall is flying by! Just one more month before we start decorating for Christmas. I'll be hostessing Thanksgiving dinner at my place this year. I bought adorable new serving dishes and super cute turkey plates and napkins. Then I made these...


Perfect to sit on each place setting or throughout the center of the table along with the other decor, don't you think? Not really corny. I just couldn't think of a good title at midnight. :)

I made single cornstalks last year but never thought to tie three together and have them stand. Love it! I was inspired by the photo inspiration challenge this week at Hand Stamped Sentiments.

Here's a quick tutorial. The pictures aren't great since I was trying to put all this together in less than an hour, but I wanted share anyway.

I used:
  •  Stampin' Up!'s new cellophane bags (you can use pretzel bags but the measurements will be off)
  • Corn Husks found at the grocery store (used to make tamales)
  • Candy Corn but any small candy would work like M&M's or Jelly Bellies
  • Raffia (or hemp or bakers twine)
  • Stampin' Up! striped ribbon
Fill the bag with candy leaving one inch at the bottom and 2 inches at the top.


Lay bag over a husk, tie at the bottom, and trim the end


Trim the bag one inch from candy at the top and tie closed


(This I didn't get a picture of) Take your fingernail and slide it through the top part of the husk to fray it. Start where you tied it closed and slide to the end. It won't work the other direction.
Tie three together and you are good to go! Not only for decoration, but a cute little gift, too.


Thanks for visiting the little blue room. Head over to Hand Stamped Sentiments to see all the other wonderful projects. I hope you'll link your project, too!


Photobucket

Monday, October 17, 2011

A Tisket, A Tasket, A Fallish Kind Of Basket

I saw a cute basket decorated for fall and thought, "I bet I can make one out of paper!" So I gave it a try and this is what I came up with.


This week's challenge at Hand Stamped Sentiments is to use the shaving cream technique, crayons, or pastel chalks.


I rarely use my chalks, but I thought they would be perfect for coloring my leaves to make them look all fallish. I love how it all turned out! It is just the right size to hold an apple with a side of caramel dip. Very fallish!


So glad I was pushed by the challenge this week to dig out my pastels. I'll have to keep them out on the craft desk to use them more often.

Thanks for stopping by for a visit!
I hope you head over to Hand Stamped Sentiments this week to play along with the challenge.

Photobucket

Thursday, March 3, 2011

Faux Turquoise Tutorial

Hello, blog friends! This post has been sitting on my computer since Monday. I love the technique but, I am not thrilled with my video. I do not like hearing my voice. The lighting is horrible because I recorded at night. It seemed like a good idea since the little ones were in bed and it was quiet. Today I decided I am still going to share the video with you because watching the shrinking process is the best part and I am really excited to share this technique with you. So, here it is...flaws and all.
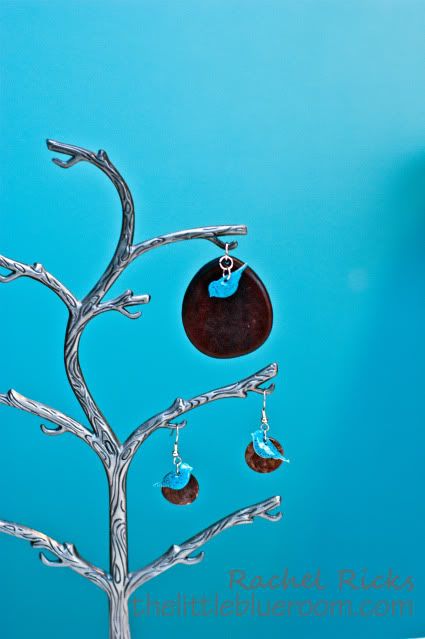
Wait, here's a pretty picture first to help me feel better about my ugly video. :) I attached a faux turquoise bird charm to a wood pendant to add to a necklace. My sister, Amy, took apart an old bracelet and designed the earrings. I just love them! She was nice enough to share her copper circles with all of us at Stamp Club. (Thanks, girl!)
Photobucket
{I feel better now. Thanks!}

(Not sure about the volume settings so you may need to turn it up or down on your computer. I'm new to this, I don't know.)


Watching it shrink is awesome, right? I freaked the first time it curled up! I discovered as you keep heating it, it will flatten back out when it is finished.

We had a wonderful time at Stamp Club making all kinds of jewelry. I like to think we kicked shrinky dink up a notch!
Here are a few photos and other ideas for other shrink film jewelry items from my sister Amy. I forgot to bring my camera that night so she took a few photos of what she created afterwards. Thanks for the pictures! (Check out her beautiful photography on her photography blog here).
Photobucket
Photobucket
Photobucket

Thanks for stopping by and checking out my first video tutorial. So, what did you think? You going to give shrink film a try?

*Edited to add the tutorial using You Tube so those using an Iphone (like me) can view the video.*


Who's ready for the weekend? I'm hoping I can get a few crafts checked off the "I wish I had time to do" list.
Happy Crafting!

Linking to:


Photobucket

LinkWithin

Related Posts with Thumbnails
Disclaimer: The content in this blog is the sole responsibility of Rachel Ricks as an independent Stampin' Up! demonstrator and the use of and content of classes, services or products offered is not endorsed by Stampin' Up!

All content, including text, photographs, and concept design works, are ©Rachel Ricks. They are shared for personal/ non-commercial use and inspiration only.

Blog header and logo design © Rachel Ricks.

flash backs