Tuesday, August 2, 2011

Stamp Club Creation July

Photobucket

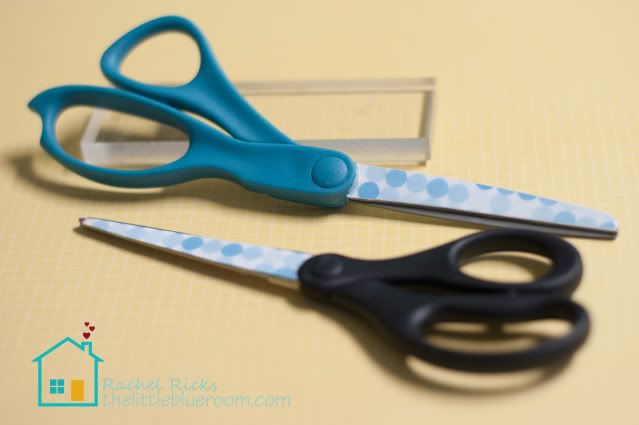
Again I was inspired by another project from Erica over on Pink Buckaroo Designs.
Photobucket

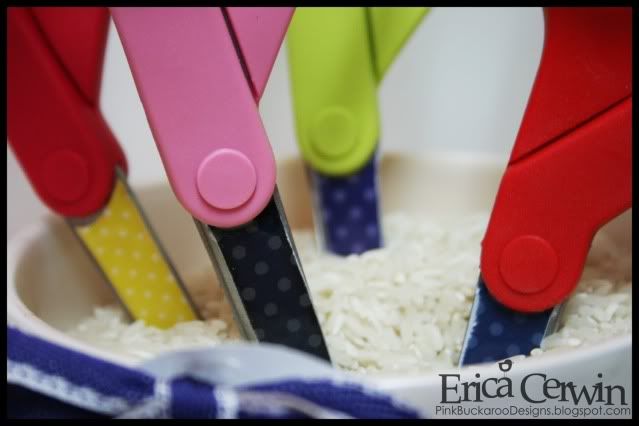
She shared this idea as a teacher appreciation idea. I thought it would be fun to decorate your crafting scissors or coupon cutting scissors, too.

My stamp club ladies loved the idea because the project was so quick and easy with an awesome result. Personally decorated scissors. Too cool! I now want to do this to every pair of scissors I see!

All you have to do is
  • cut a piece of patterned paper to fit over the blade
  • glue to the blade using Crystal Effects
  • sand around the edges to give it a nice finished look
  • cover with a layer of Crystal Effects
  • let dry
I made my set to match the little blue room.
Photobucket

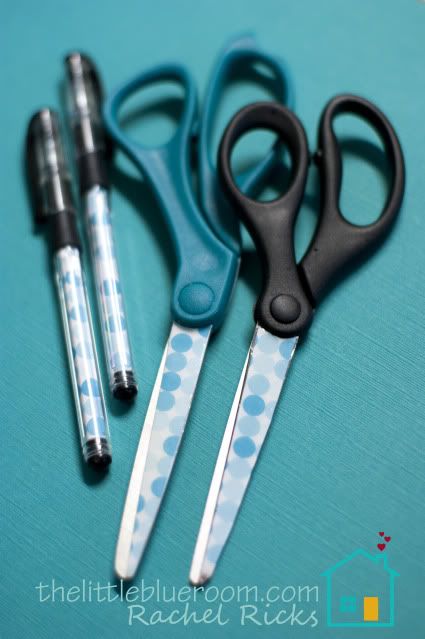
The pens are even easier to make.
  • unscrew the end of an RSVP pen
  • cut a piece of patterned paper long enough to fit inside the casing and wide enough to wrap around the ink tube inside
  • roll the patterned paper into a tube and slide it into the pen casing
  • screw the end back on
Here's a coupon clipping kit I put together real quick. Seriously, it took like 5 minutes to make. It takes the Crystal Effects longer to dry than it takes to put the kit together. I used the same process used to cover the scissors on the circle latch that the elastic wraps around to add a little flair to the coupon holder and to make it all matchy-matchy.
Photobucket
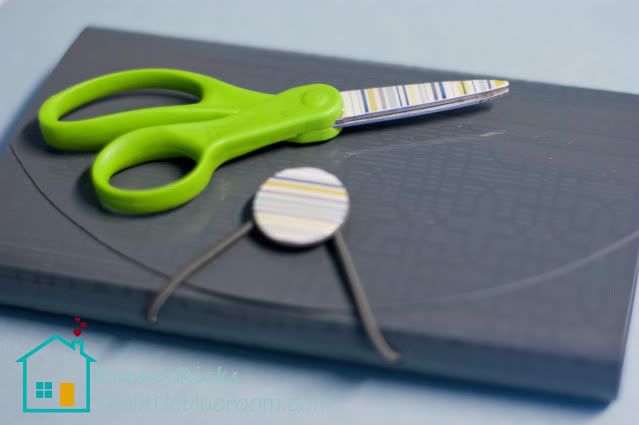
The scissors are just the right size to slide into the holder so I can always find my scissors when I'm ready to start clipping.

I mentioned in my last post that the real life little blue room is getting a makeover soon. I've been searching the web for great room layout ideas and clever storage ideas. If you've found something that works for you or you hope to implement into your craft room someday please add the link. I'd appreciate more inspiration as I plan out the new and improved little blue room. You can leave a link below. Thanks!


Photobucket

Wednesday, July 27, 2011

Wow...Time Really Does Fly!

I didn't realize it had been so long since I've shared on here until I received an email from a sweet lady letting me know how much she enjoys my blog and she closed the email with "let me know if you decide to continue your blog." I was like, what? I'm still blogging! Then I went to my blog and noticed I had not blogged in more than two months. Wow...time really does fly! Thank you, Keren, for your email and I'm so glad you found my blog and took the time to send me an email. You can visit Keren's blog with wonderful Stampin' Up ideas here > Stampin' Journey of an Everyday Crafter.

We've been busy with lots of summer fun these past two months. We went the pool ALOT. I helped with a craft at Cub Scout Day Camp. I was able to go to our church girls youth camp for a week. I made my youngest daughter a bandana stars and stripes top using some of my favorite striped ribbon from Stampin' Up.
Photobucket

Oh, and these hair things too. I used the Big Shot to cut the blue and white stars out of foam. Then, punched a hole in the center with the Crop-a-dile. To finish it off I tied the stars to the braids with the striped ribbon.
Photobucket

Last summer I was inspired by these memory jars. I added them to my ever growing to-do list but, never got around to making any. Don't you love those vinyl words on the jars?
Photobucket

These are from Martha Stewart.
Photobucket

When I saw this project on Erica's blog it was the kick in the pants I needed to go try making my own.
 Photobucket


So, this was our Stamp Club creation in June.
Photobucket
I used a Stampin' Up digital kit to print out the embellishments we used in our project.
Photobucket
Just $9.95. With digital you can print as many as you need and in any size you want, over and over again! So, I decided on the size I wanted for this project and printed them out on Whisper White Cardstock. Then, we simply cut out the embellishments and added them to our memory jars.

This is a collection of photo jars Amy made to display at her photography studio. I love how they turned out and how they demonstrate using different themes, not just beach.
Photobucket

Stamp Club for July is tomorrow night! I hope to post our club creation soon.

Well, there you go, a little catchin' up on the blog. Things will probably be slow for another month or so as the real life little blue room is being rearranged and redecorated in August. I am SO excited! I've been sketching ideas and measuring things and hanging out on pinterest.com gathering lots of inspiration. Thanks for being patient with me. I should be back to sharing on a regular basis after school starts.

I hope you are all having a wonderful summer!

Photobucket

Tuesday, March 15, 2011

Burlap Banner

Isn't burlap just wonderful! I love the texture and shabby chic look, especially in these beautiful photos from Amy Boston Photography.

I made my banner a little differently, it's reversable. The "I DO" and "MR & MRS" are the same banner, just flipped. Two photo props in one. How cool is that?
Photobucket

Photobucket


I wanted to play along with the contest over on Lil Blue Boo but haven't had the time to really work on anything, but I did use fabric painting so I went ahead and linked up.


Burlap Banners coming soon to the Little Blue Room Etsy store.


Thanks for visiting The Little Blue Room.

Photobucket

Thursday, March 3, 2011

Faux Turquoise Tutorial

Hello, blog friends! This post has been sitting on my computer since Monday. I love the technique but, I am not thrilled with my video. I do not like hearing my voice. The lighting is horrible because I recorded at night. It seemed like a good idea since the little ones were in bed and it was quiet. Today I decided I am still going to share the video with you because watching the shrinking process is the best part and I am really excited to share this technique with you. So, here it is...flaws and all.
Wait, here's a pretty picture first to help me feel better about my ugly video. :) I attached a faux turquoise bird charm to a wood pendant to add to a necklace. My sister, Amy, took apart an old bracelet and designed the earrings. I just love them! She was nice enough to share her copper circles with all of us at Stamp Club. (Thanks, girl!)
Photobucket
{I feel better now. Thanks!}

(Not sure about the volume settings so you may need to turn it up or down on your computer. I'm new to this, I don't know.)


Watching it shrink is awesome, right? I freaked the first time it curled up! I discovered as you keep heating it, it will flatten back out when it is finished.

We had a wonderful time at Stamp Club making all kinds of jewelry. I like to think we kicked shrinky dink up a notch!
Here are a few photos and other ideas for other shrink film jewelry items from my sister Amy. I forgot to bring my camera that night so she took a few photos of what she created afterwards. Thanks for the pictures! (Check out her beautiful photography on her photography blog here).
Photobucket
Photobucket
Photobucket

Thanks for stopping by and checking out my first video tutorial. So, what did you think? You going to give shrink film a try?

*Edited to add the tutorial using You Tube so those using an Iphone (like me) can view the video.*


Who's ready for the weekend? I'm hoping I can get a few crafts checked off the "I wish I had time to do" list.
Happy Crafting!

Linking to:


Photobucket

Tuesday, February 22, 2011

Hoo Sign

A friend of mine makes adorable hairblooms and asked if I would make a sign for her booth at an upcoming kids clothing sale. Here company name is {Hoo}ligans & Co so she wanted owls to be a part of the design.
I sketched this for her.

Photobucket
She loved it!
I then got started thinking of what materials I wanted to use to make this sketch come to life. I finally decided to use fabric for the owls and the nest. Then vinyl for the words, tree branch, and cloud. I used buttons for the mama owl's eyes and cut felt flowers for the lashes.
Photobucket
I thought it turned out super cute! I hope she likes it as much as I do.

If you are local you should definitely head over to Kid's Market and grab yourself some hairblooms!

Thanks for dropping by.

Photobucket

Wednesday, February 16, 2011

What To Do at Stamp Club? {Edited to add another photo}

So I am trying to decide on what project to do this month with my Stamp Club group. Here's an idea using shrink plastic to create personalized charms. For my practice test I created this for my sister-in-law. I had a tiny heart on top but my little ring was too small and it wouldn't fit. It is SO awesome to watch it shrink!! Still figuring out what works well on the shrink plastic and what doesn't. I think I will try sanding it slightly and spraying a clear coat to smooth it out and make it shine.
Here I am wearing it. Wow! Try to look past the freckles. :)
Photobucket
{To show the size I included a dime in the photo.}
Photobucket
So, what do you think? Something you would be interested in learning?
More ideas using this shrinky stuff coming soon but for now, playtime over, I need to clean house!

Hope you are having a happy Wednesday.

Photobucket

Thursday, February 10, 2011

Attempt Number Two

I attended the second baby shower this month. I had fun making a bunch of gifts. Thank you friends for having lots of babies so I have an excuse to make cute stuff!
Photobucket
This was my second attempt at screen printing a onesie and sewing little baby shoes. This time around I put to use what I learned with mistakes from my first attempts. Practice does make things easier. A few more baby showers and I'll be a pro at screen printing onesies and sewing baby shoes. Hahaha. :) I also made my first burp cloth and crinkly teething toy.

The mama loved the fabric I used for everything and the personalized onesie. Yay! If she's happy, I'm happy!

Tomorrow is Friday! Woo hoo! Let the weekend begin.

Photobucket

Thursday, February 3, 2011

All Packaged Up

Here's my gift all packaged up and ready to give. I tied it all up with red ribbon and attached a tag with a small clothespin. I made a punch art baby onesie and added it to the tag. I think it turned out really cute.
My gift was well received, but everyone especially loved the shoes.
Photobucket
Who's ready for Friday. Me, me, me! I hope everyone enjoys the weekend.
Photobucket

My First Attempt

I have a baby shower to attend tonight and another one next Thursday night so I thought I'd try my hand at screen printing the gifts. I kept it super simple as I am still learning.

Photobucket
I also made a pair of baby booties to match using old t-shirts for the fabric. It was my first attempt at the booties as well.
I learned a few things during both projects for my next attempt but, overall, I think it all turned out pretty cute. What do you think?


Thanks for visiting the little blue room!
Photobucket

Saturday, October 9, 2010

Something Wicked Cool This Way Comes

I always have so much fun decorating for Halloween. This year I came across this idea from Martha Stewart {click here} and just had to make one. I looked at the instructions and thought of all the random items in the garage I could use to make this project. I had pieces of left over MDF, black paint, and other items from a project I finished earlier that week that could be used to create my witch, so I was determined to make it myself and only using the items I had in my garage.
The most difficult part of the project was trying to cleverly use the items I already had. If you just head to the hardware store and buy the wood and other supplies this project can be done in an afternoon.

Step one:
Print out the template found here > witch template. Spray the board with repositional spray adhesive and lay out the template following the guide numbers. I didn't even cut around the template. I just stuck it all down. I really liked using the repositional adhesive spray to just stick down the template you are going to cut. That really is a time saver!
Photobucket
You can just cut out the pattern lay it out and trace it, if you don't want to buy repositional spray adhesive. The repositional spray adhesive is a little pricey at around $7 a can, but I used a 40% off coupon to cut the cost. I did learn from a mistake...don't get carried away spraying the adhesive on...too much makes it too sticky and the paper doesn't want to peel off. I finally got the paper off but it left residue squares from the paper that still show up when you look closely. So all you need is a light spray of the adhesive.

Step two:
Using a jigsaw cut the template following the outline.
Photobucket
I suggest starting at the bottom of the dress. Because it was my first time using a jigsaw, it gave me time to get used to how the jigsaw felt and worked before I needed to cut out detailed parts of the face and sleeves. I was so worried I was going to cut the face wrong and have to start all over. I just went super slow and it was fine. I didn't follow all of the lines perfectly, but I never messed up so badly that I couldn't just cut back to the outline and keep going. So don't freak out on little mistakes, no one will notice when you are finished. Photobucket

Step
three:
Peel off the template and paint her black. I had a little black spray paint so I sprayed the edges and the back then used some left over satin black paint on the front. I set her out over night and did not like how shiny she was because you could see every flaw. No woman likes to show off her flaws so I grabbed some leftover black chalkboard paint to give her a flat finish. I like her much better.

Step four:
Hammer the support pole into the ground about 12 inches. I used old tent poles that we had in our "take to the dump" pile. The one time I'm happy my husband had not taken the pile to the dump yet, lol. Then attach the witch to the pole. I used strips of hanger tape. It seems to be holding just fine so far.
Photobucket
Photobucket

Step five:
Attach the accessories. I found my lantern at a thrift store for only 55 cents. I added a screw on the back of her hand and hung the lantern from it. Then I found an old cinnamon scented broom at a thrift store. I cut off the broom end and attached it to a large stick I picked up on the side of the road. I attached the broom the same way I attached the pole.

So the total cost for me to make my witch was less than $3 because of the supplies I already had on hand!

Photobucket

I finished the scene with a cauldron over a fire. I used a pile of sticks I found on the side of the road to make my fire pit. I wired the sticks together to make a circle. Then I used a glass bowl wrapped in a yellow plastic table cloth and orange sparkle tulle with an orange strobe light to create my glowing flickering fire. I found the cauldron at Party City and lined it with foil. Then I placed white Christmas lights in the bottom and stuffed it with green cellophane, also from Party City. I hope to buy a smoke machine for next year so the cauldron can have a smoking glowing brew, but for this year, I think she is wicked cool!


Photobucket

Monday, June 29, 2009

Stamp Club Creations June

Photobucket

These are the fun projects we made at our Stamp Club meeting this month.

I used the Big Shot and Stars #2 die (113461) to cut through foam to create these fun patriotic projects.

We altered a pair of flip flops to wear on the Fourth of July. It looks even better on white flip flops but they didn't have white in my size.

We decorated a roll of Lifesavers to make the cute firecrackers. We used a new punch you'll be able to purchase July 1st, the Modern Label punch (11630)for the tag.

Using the scraps we made a foam puzzle. My 3 year old inspired this one. She was playing with my scraps as I was working on the other projects and said, "Mom, it's like a puzzle!"
Slide this into a Ziplock bag and slip it into your purse for those times your kids need something to keep them busy. You could even stamp a design or words across the front to create a more difficult puzzle. These could make cute and inexpensive party favors for birthdays or family reunions.

LinkWithin

Related Posts with Thumbnails
Disclaimer: The content in this blog is the sole responsibility of Rachel Ricks as an independent Stampin' Up! demonstrator and the use of and content of classes, services or products offered is not endorsed by Stampin' Up!

All content, including text, photographs, and concept design works, are ©Rachel Ricks. They are shared for personal/ non-commercial use and inspiration only.

Blog header and logo design © Rachel Ricks.

flash backs