
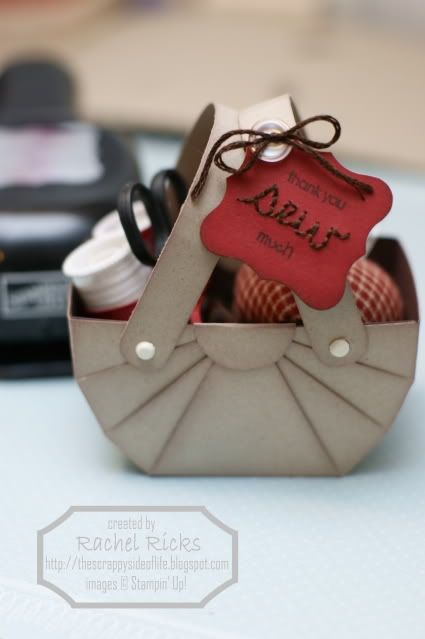
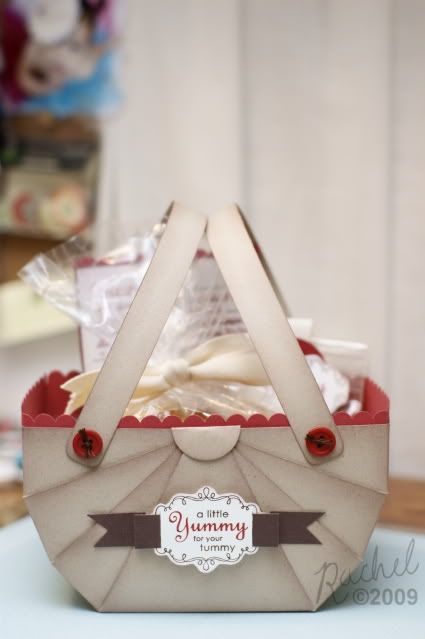
I wanted to make a little thank you for a friend. She has been teaching girls ages 8 - 12 at our church how to sew. I knew I wanted it to have a sewing theme. I saw a sewing kit while out shopping and thought the tiny spools of thread and scissors were super cute. I grabbed it thinking I could use it somehow. I thought a sewing basket would be cute. I googled sewing baskets and a pretty nantucket basket came up in the search. So I took the basket I made last month with my stamp club and tweeked it a little bit more using the nantucket handles as inspiration. I really like how it turned out and thought you may enjoy learning how to make one as well.
I created the basket idea using a basket called 2, 4, 6...I think. Then just built the design from that.
You will need:
6x6 square carstock or designer paper
2 one half x 6 inch strips of cardstock or designer paper
scoring tool
scissors
1" circle punch
corner rounder
4 brads
adhesive
Step one
Score your 6x6 inch square at 2 inches and 4 inches
Turn and score again at 2 inches and 4 inches
The scored lines will create something that looks like a tic-tac-toe board
Step Two
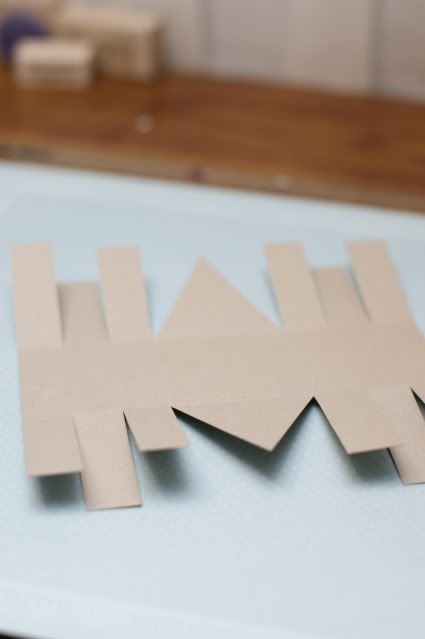
Following the score lines cut 2 inches deep at the 2 inch line and 4 inch line
Do the same on the opposite side
It will look like this:

Step Three
Cut the center flap into a triangle and both side flaps into thirds.
Like this:
Step Four
Trim 1/4 " off of the 2nd and 3rd strips (counting from the outside edge)

Step Five
Starting with the first and longest strip bring the two side together and attach.
Then layer the next two and then the last two.
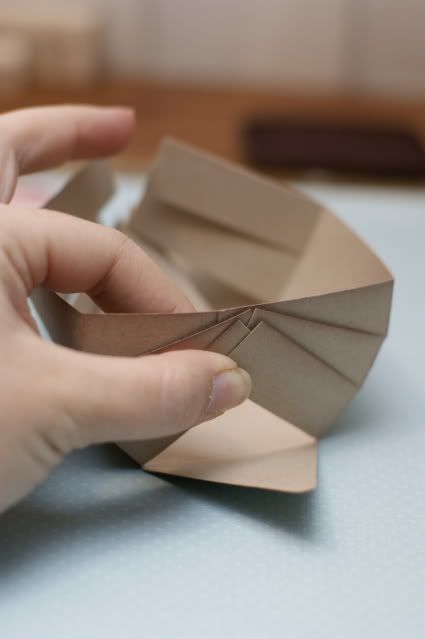
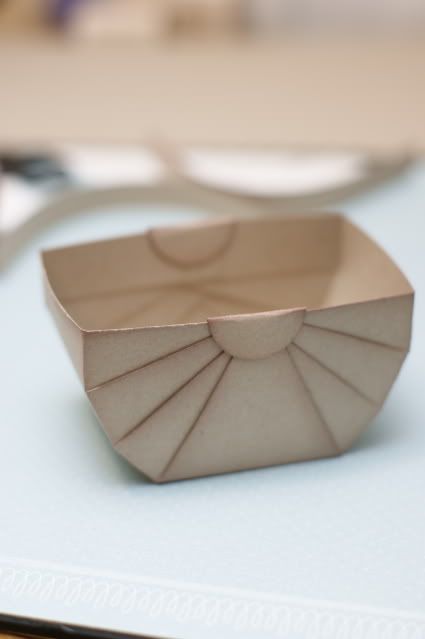
Then attach the triangle flap on top of the flaps.
(I inked the edges of everything first to give it more depth)
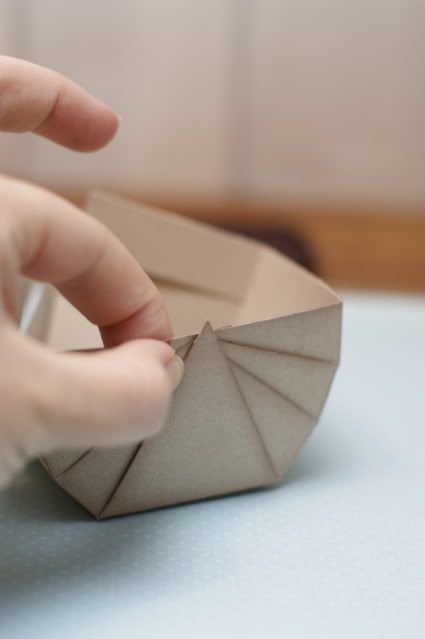
Step Six
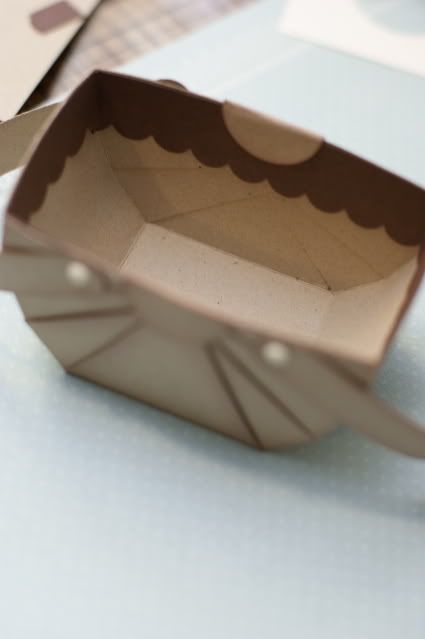
Punch two 1" circles. Attach them over the points of the triangle. (I trimmed the point off before attaching the circle)
Step Seven
Cut two 1/2" x 6" strips. Use a corner rounder on the ends.
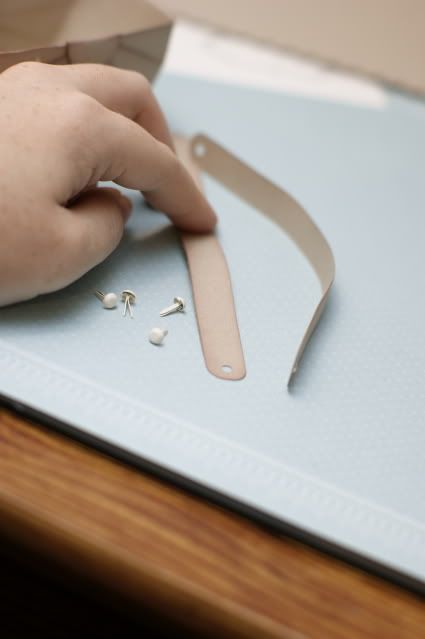
Attach about 3/4 inches from the end of the basket with brads.
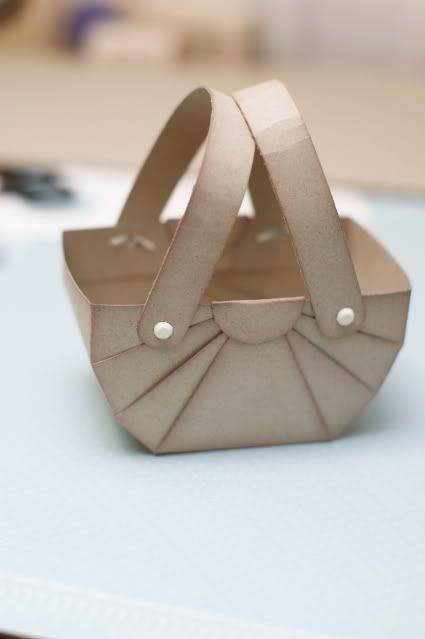
Step Eight
Decorate!
You can add layers of paper onto the bakset, line the inside, create an edge, stitch on the basket, so much potiential.
I kept this one simple.
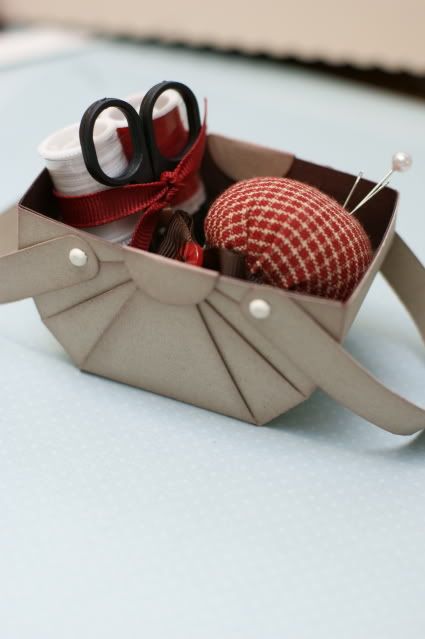
I wanted to cover up the brad backs so I added a strip of scallop edge paper on the inside.
Then I punched a tag using the Curly Label punch. I stamped "thank you" and then stitched the word "sew" below. Since I don't have a small stamp that says much I just hand wrote it under "sew." I added a button and used embroidery floss to tie the tag to the basket.
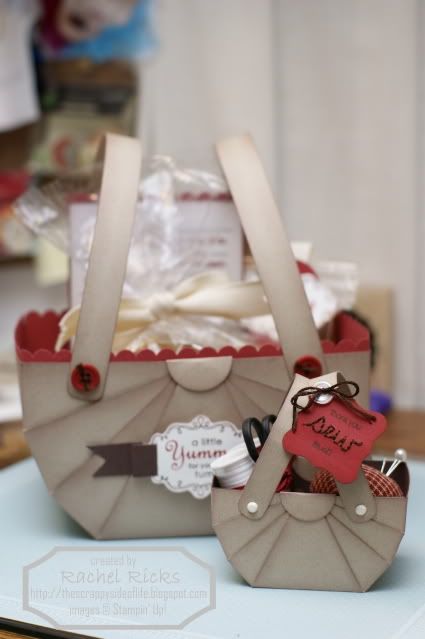
Inside I have 4 tiny spools of thread wrapped in a strip of Window Sheet paper to keep them in place, tiny scissors, and a tiny wrist pin coushin I made.
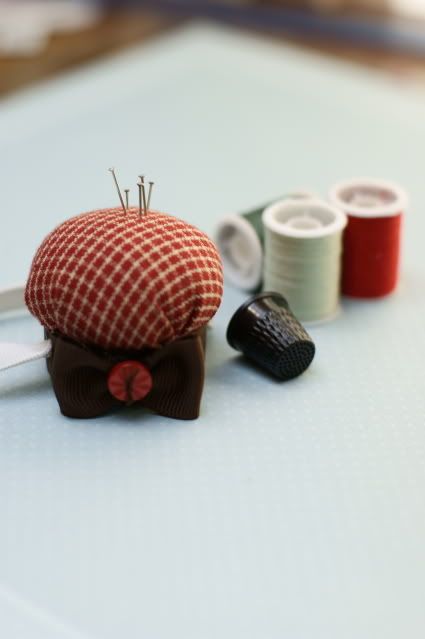
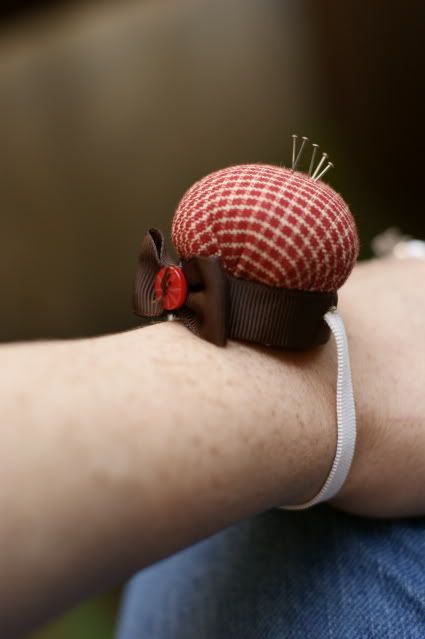
I used this tutorial (click here)to make the pin coushin. The only thing I changed was, I added the elastic by punching holes on opposite sides using the cropodile, threaded the elastic through and tied it in knots at the ends.
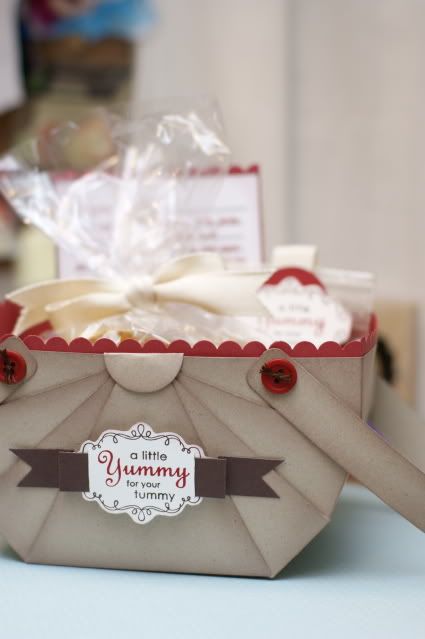
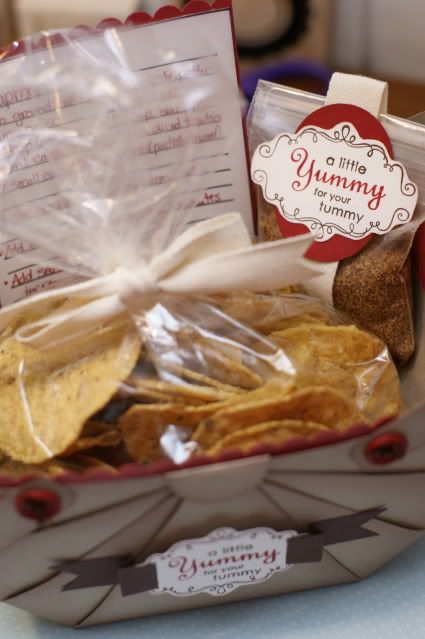
The COOLEST thing about this basket design is you can make the same basket in 3 different sizes!! You can use a 6x6 inch square, a 9x9 inch square, or a 12x12 inch square. Just score your square into thirds and go from there. So I HAD to try out the largest. All put together it measures 4 inches deep and just under 7 inches across!
Again I kept the decorating simple this time.
I filled this one with a bag of tortillia chips, a packet of seasonings to use to make the best chili ever, and the recipe.
I wasn't really planning on making this basket so I didn't have all the things I'd like to add on hand. I think a nice pot holder and laddle would be nice added to this gift basket. Instead of chips a cornbread kit and a small decorative muffin tin may fit. Tons of ideas! You can decorate this with so many themes and fill it with so many goodies.
Hope you think it was worth the wait, since I was late.
I'd love to see any of your decorated baskets and ideas. Just leave a link to a photo of your creations in the comments so we can all be inspired.
Have fun creating!
106 comments:
AMAZING! I just love what you've done here! I'll be giving you a shout out this week on my Friday Faves post :-)
"SEW" cute! I seriously loves how you stiched the word sew. The whole thing is adorable. The chilli basket is cute as well and I love me some chilli! the basket just gets cuter the begger it gets.
dude! this is super-cute!! Thanks for sharing!
Cute! Cute! Cute!
Thanks for sharing such a simple tutorial with a great WOW factor!! I'll definitely have to make some of these!
oh I just love it! thank you so much for sharing. will definitely have to make one
I love the little baskets, they are adorable!!
WoW! Love this!!!! I might have to try one of these!
simply superb :)
This is adorable.. I love all the details.. Great job.
j'aime beaucoup ce petit panier !!! merci !!! bises
http://scrapgala.canalblog.com/archives/2011/04/07/20834865.html#comments
I'M IN LOVE WITH THIS!!!
This little basket is soooo cute! And the tutorial is great! Thank you! I've now made a sewing basked of my own. :)
http://handmadebyzima.blogspot.com/2011/09/sykorg.html
Thank you so much looks like everyone is pinning this on pintrest! Can't wait to try this! Can't tell you enough how cute this is!
Beyond adorable! Thank you!
absolutely gorgeous !
This is awesome! Thank you so much for the tutorial!
Loved this little basket. I made one using your very easy to follow tutorial as part of a Christmas gift.
This has to be the cutest basket I've ever seen!!!! Thanks so much for sharing the instructions :)
I saw this on pinterest and love it....thank you so much for sharing your tutorial on this....I will be making this for sure....awesome projects......
Thank you so much for the tutorial!
Hugs
Maria Luisa
Someone just shared your blog link with me and I LOVE this darling basket!!
Super cute, thanks for the instructions! I want to make this for sure!
This is such an adorable basket, one of the cutest I've seen. Thanks so much for sharing the instructions on making it.
My friend has just emailed me a link to your sewing basket project. It is absolutely gorgeous, than you sooooo much for sharing the lovely photo and an even BIGGER THANK YOU for sharing the instructions too. I'm just adding you to my favourites list and am sure to be peeking through your other posts.
This basket is just gorgeous! Thank you so much for sharing the tutorial!! I have made one myself and I linked it to your tutorial! Here is mine: http://sunshinesblogg.blogspot.com/2012/03/easter-basketpaske-kurv.html
Amazing basket!! TFS the instructions!
Thank you for sharing your lovley basket instructions.
I made one myself and have linked back to you, take a peek if you have the time.
Thank you!
http://macaulay-arts.blogspot.com/2012/03/easter-baskets-dt-vintage.html
Hugs Nina x
Found you on Pintrest and love this little basket! I made one, shared it with friends and linked back to this tutorial post from my blog too. Thanks for sharing!!
Love this little basket. I think I will use it as a Mother's Day gift/class. so cute and can be decorated to match any season or holiday. Thanks so much for sharing.
I have found your basket on Pinterest! I love it! and I have tried! If you like, you can visit me at this link http://acountrywhisper.blogspot.it/2012/04/per-pasqua-unallegra-tavolozza.html
to see my version of your basket! It is perfect for easter cookies!
thanks for sharing the instructions and hugs from italy
Manu
This is absolutely fabulous! I'm seriously in awe. I must make time to try this!
Very clever and cute and so versatile, too. Thanks for sharing.
That is such a cute little basket! Thank you for the tutorial.
"sew" clever! LOVE this. found this project on pinterest and pinned it. I'm also following you on GFC and I'd love for you to come visit my blog sometime. Have an amazing day and thanks so much for sharing this project! I will definitely use this.
Marilyn
4you-withlove.blogspot.com
thx for the explanations!!
here is my version
http://tessie.over-blog.com/article-paniers-2-4-6-107010302.html
This is such a fun basket- thanks for the tutorial- gotta give this a try! I found you on Clare Buswell's blog with her cute set!
I saw your basket on Pinterest and couldn't wait to make one too! I linked back to your post from my blog. If you're interested, you can check out my project HERE. Thanks for sharing the tutorial!
Tam
One Happy Stamper
So cute!Just found this on Pinterest. Think I'll explore while I'm here!
I love this!! Ty for showing us how to do it !! I am going to make one right now :)
Amanda
cricktncrafts.blogspot.com
This basket was the perfect thing I needed for a Kindergarten Mom's Survival Kit. Thank you for posting directions. You can see my basket here: http://www.ambersantics.blogspot.com/2012/08/oclmay-arts-back-to-school-survival-kit.html
Hello. I am Mésangathéna and as I find him(it) very beautiful tone small basket, I am going to propose it in the forum Squeaky clean and simple where I am an organizer(presenter). I shall want to have your approval. Thank you.
Rachel, I saw your super cute sewing basket a couple of months ago and I totally fell in love with it :) !!! Today I had the chance to show off the one I made and I hope you like it.....thank you for the inspiration! I know I will try to make a bigger basket soon again!!! Hugs ~S~
http://silkeledlow.blogspot.com/2012/11/flourishes-november-release-day-2.html
Its perfect! Thanks "saw" much for sharing this tutorial! Its just what i needed for a present!
Oh how beautiful!!! Thank you for this tutorial!
Greetings from Germany, bayaria
Kerstin
Bardzo dziękuję za kurs-jest świetny!
a oto moja praca:
http://mimowolnezauroczenia.blogspot.com/2013/03/bez-jaj.html
pozdrawiam
Mimowolne Zauroczenia
Such a cute basket! And your tutorial is so easy to understand. Thanx a ton, Rachel. Would love it if you check out my version of the basket at my blog http://nanspaintpaperscissors.blogspot.in/2012/10/little-bit-of-red.html
I love your basket, it's so sweet, .....!!!!!
Such an amazing tutorial.Have pinned it here:Box tutorials and hope it sends lots of traffic your way
I LOVE this! So cute, & a great tutorial -thank you!
These baskets are awesome! I'm going to try one of the bigger sizes for my daughters Easter basket! Thanks for sharing!
I love this! Thank you for sharing. This will be on my inspiration blog post.
Just found your post on Pinterest. Love this basket; the tutorial is fantastic! Just wondering if this basket could be made using the new gift bag punch board. Thanks so much for sharing!
Love this I must try it
Love this I must try it
I found this on Pinterest which led me to your blog - thank you so much for sharing this excellent tutorial. I have made up the basket and have just posted about it on my blog, crediting you with the design and adding a link to your blog. I hope you like what I have done with it!
Shoshi
Thank you for visiting my blog so promptly, Rachel, and for your kind words about my version of your delightful little basket! I am so grateful to you for posting about this because it's such a great project and I know I shall make it again. Our neighbour was absolutely delighted with it, which was very gratifying! Thank you again.
Shoshi
I just made a way bigger one out of cardboard, as a box for a baby gift...! I'm going to paint it pink. Thanks for such a great idea...!'
Too bad can't include a picture!
I just made a way bigger one out of cardboard, as a box for a baby gift...! I'm going to paint it pink. Thanks for such a great idea...!'
kerala spices online shopping
Buy Herbs and Spices Online from spsbrands, you can get Wholesale Price with High Quality. Fenugreek, Cardamom, Coriander, Garlic, Ginger, Cloves.Buy Herbs and Spices Online from spsbrands, you can get Wholesale .You can order Herbs, Spices buy Indian spices and other masala and seasonings from home We Ship All over India.Our spsbrands have quality of spice products.we provide delicious spices in online.we give you the fresh spices products.Everyone can buy spice products easily in online on spsbrands shop website.Our spices are essential for making authentic spice house.
Toda Woh Taluq Jo Humari Har Baat Se ThaUs Ko Dukh Najane Meri Kis Baat Se ThaSirf Taluq Raha, Logo Ki Tarha Woh BhiJo Achi Tarha Waqif Meri Har Baat Se Tha. play bazaar Jab gardishon mein jam thekitne hasin satta king ayyam thehum hi na the rusava faqatwo aap bhi badnam thekahate hain kuch arsa huaqabe mein bhi asanam theanjam ke kya sochatena-vaqif-e-anjam theahad-e-javani mein “adam”sab log gulandam the.
If you need creative website designing services, just visit OGEN Infosystem for the best Website Designing Services in Delhi, India and also get SEO Services to get more traffic on your website.
Web Designing Company in Delhi
Servo Star is a prominent Servo Stabilizer manufacturer, providing a wide range of [url=https://www.servostabilizer.org.in]Servo Voltage Stabilizer in India[/url] and an array starting from 5 KVA to 5000 KVA for residential, industrial and medical use.
[url=https://www.servostabilizer.org.in/servo-stabilizer-for-lift-elevator]Servo Stabilizer for Lift[/url]
[url=https://www.servostabilizer.org.in/product/step-down-transformer-2-kva]2 KVA Step Down Transformer[/url]
TVH, Best Video & Film Production Houses/Company in Delhi Ncr. we Provides Corporate Films, Documentary Films, Short Makers, Explainer Videos, & promotional video services in delhi ncr. Call us @ 8178662477. Best Video & Film Production Houses/company in Delhi NCR Visit Us: film production house in delhi, corporate video production company
Very Nice valuable information by this blog keep sharing, thank you for sharing us. If you are interested for CRM Software visit here:- CRM Software in Mumbai | CRM Software In Pune | CRM Software in Ahmedabad | Order Management Software in Mumbai | Field Management Software in Mumbai
Love problem solution is the biggest issue of today’s generation. They don’t know how to handle this, it makes them feel like a hell, they try to act stupid and suddenly their life turns from happy to the Grey world.
Love problem solution
Love problem solution in Bangalore
Love problem solution in Canada
Love problem solution in Chandigarh
Love problem solution in Delhi
Love problem solution in India
Love problem solution in Italy
Love problem solution in Mumbai
Love problem solution in UAE
Well I definitely enjoyed reading it. This tip procured by you is very constructive for correct planning.
event management companies
event management companies in delhi
Thanks for the information. Keep posting these kind of posts.
Servo Stabilizers, Servomax offers a wide range of Servo Voltage Stabilizer units to suit various types of domestic and industrial applications such as metal processing equipment, production lines, construction devices, elevators, medical equipment, etc. Call us on +91 9111234567 to get the best quote for Servo Stabilizer Price.
Really Great Post & Thanks for sharing.
Oflox Is The Best Web Designing Company In Dehradun
Hiring The Equitable Local Builders In London For Home Improvements Services
It is always said that people often desire to be in a house that could give them a desired luxury and comfort and that could only be done with some efforts. Although some manage to furnish their home by themselves, at times this can be tedious to them and also time taking.
Microsoft Office suite has become a must-have not only for large corporations but for individual users as well. The latter face the necessity to download Office programs once they understand that apps integrated into their OS are too basic and can’t satisfy their needs.
Microsoft Office Torrent
Thank you for sharing great content.
buy spices online
lTop 10 Best Event Management Companies In Delhi
Hotstar Cookies Free Premium Account (100% Working)
Ae Dil Hai Mushkil Full Movie Download In 720p 500mb - Filmyhit, Dailymotion, Watch Online
फेसबुक आईडी कैसे बनाते है
jio keypad phone hard reset
free dish tv channels setting
what is magicpin
Ala Vaikunthapurramuloo Full movie in Hindi dubbed Leaked By Tamilrockers Filmywap
Top 10 Best event management company in Bhubaneswar
Whatsapp Par Online Hote Huye Bhi Offline Kaise Dikhe
Nice Blog !
Our experts at QuickBooks Phone Number never compromise with the quality of our service in a period of uncertainty.
It was a fantastic article to read...very interesting...You have supplied a good article....thanks for sharing.
digital marketing training in hyderabad
digital marketing course in ameerpet
digital marketing course training in hyderabad ameerpet
digital marketing online training in hyderabad
digital marketing course in hyderabad
digital marketing course training in hyderabad
digital marketing course with internship in hyderabad
digital marketing training institute in hyderabad
digital marketing course in hyderabad ameerpet
digital marketing course in hyderabad sr nagar
digital marketing course in hyderabad dilsukhnagar
nice blog
buy kerala spices online
Super Cute...Thankyou for sharing
online bus ticket booking
Nice! thank you so much! Thank you for sharing. Your blog posts are more interesting and informative
buy spices online
Kuchesar fort
Tourist Places Visit Near Delhi
Kids friendly resorts near delhi
Places near Delhi for Weekend Getaways
Bengal beauty parlour in meerut
Bengal beauty parlour meerut
CyberWorx Technologies Pvt. Ltd. is the best solution IT company. We provides Best Website Designing Agency in Bangalore.
Servokon is one of the Best Servo Stabilizer Manufacturer in India. The team here is very professional and skilled in providing the customer with the best services. We use hi-tech technology and best quality raw materials in order to provide customers with automatic voltage Stabilizer that come equipped with the feature of managing load conditions and wide voltage fluctuating ranges.
Celebrating 52+ years Of Excellence in the field of manufacturing Servo Voltage Stabilizer/Automatic Voltage Controller, Special Purpose Transformer & Anodizing & Electroplating Rectifiers
This article is very helpful and interesting information. Thanks for sharing. Top Interior Design Institute in Delhi And Interior Design Course in Delhi.
best clat coaching in delhi help you to crack clat exam in your first attempt. This article lists thebestclat coaching in delhi. Each of the institutes listed on our website provides excellent clat instruction with advanced teaching techniques. In terms of success knowledge nation law center had a higher selection rate in the previous year in addition to each coaching institute using some special techniques that really brought results. In order to prepare for CLAT, you must enroll for coaching in accordance with your needs.
if you want to Ek Villain Returns Movie Download then click given link.
Very informative Hindi Bandhan
inhindigyan
watch all your favroutie korean dramas here
Best Indian students database providers at Best Price In india
great blog on such a great topic. carpet steam cleaning Brisbane
You can use the Google Search API to get SERP data including web, image, and news results. Our API Providing Real-time data from Google SERP. Use it right away!
How to Get Google SERP API
As you heard lot of time about single property websites by your friends parents and your colleague. We are real estate solution provider of all type of services.
Thanks for sharing such informative and useful content with us keep sharing.
Best Interior designers in Hanamkonda
Nice content. We run a web design and development company in delhi. Kindly check our website.
Great Post. Thank you sharing the information
Kerala Spices
Thanks for sharing this valuable information. I would like to share information about iOS application developers in India. Appconsultio is offering mobile app development services by utilizing ongoing innovations. We have faith in moving forward with technology and convey extraordinary and interactive applications. Our iOS application developers in India possess exceptional expertise in creating high-quality applications for Apple devices, leveraging their technical prowess and creative mindset to deliver seamless and engaging user experiences.
Very amazing information, thank you so much for sharing with us. Visit Import Globals for leading Global Import Export Data provider for 100+ countries i.e. Indonesia, Russia, Brazil, Ukraine, and Botswana.
Brazil Import Data
Explore a fulfilling nursing career in picturesque New Zealand, where we're seeking dedicated professionals for a permanent role. Ideal candidates possess strong clinical skills and a passion for providing exceptional patient care. You'll join a vibrant healthcare team, supporting diverse patients in a dynamic setting. We offer a competitive salary, professional growth opportunities, and a supportive work environment. Applicants need a recognized nursing credential and eligibility to practice in New Zealand. This is your chance to make a tangible difference while enjoying New Zealand's beautiful landscapes and friendly communities. Apply today and embark on a rewarding journey.
https://www.dynamichealthstaff.com/nurse-vacancy-in-new-zealand
Cool
Those Nantucket handles are a nice touch. I've been procrastinating on my own crafts by obsessively checking the local weather radar map.
The nantucket handles look cool. I'm more into construction, so I'm usually just using a concrete calculator uk for my builds.
Cool
Post a Comment