Sunday, March 29, 2009

Color Challenge...

Well, I made it one more week in Scrap Idol!
The challenge this week was a color challenge. We also had to use a punch which is a no brainer for me. I always use at least one punch on every page.
Photobucket
We had to use these colors as our main color scheme but it was ok to add in little of other colors. I added a pop of Tangerine Tango.
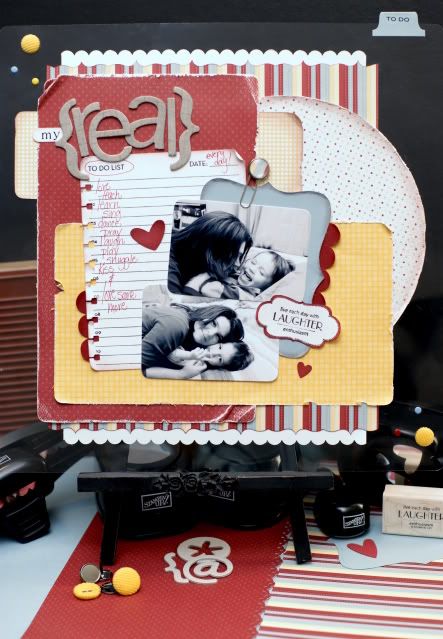
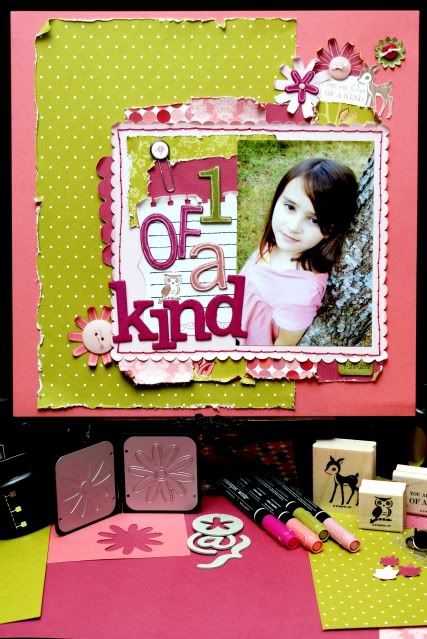
The first thing I did was pull out my Stampin' Up catalog and search through all of the papers to see what I could use with this challenge. The most difficult part was finding a picture that went with the color scheme. I was so excited when I found the pictures of my youngest daughter wearing the pillow case dress I made. Then I remembered I had fabric left over and thought it would be cool to include the fabric on the page some where. Then 2 days later and after lots of cutting, wasted paper, peeling off, and rearranging I ended up with this...
Photobucket
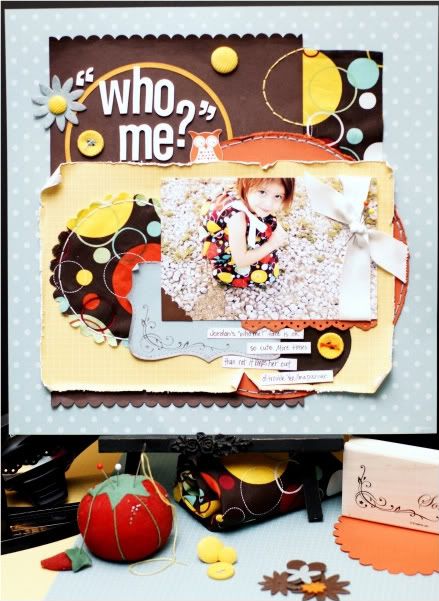
I really wanted to pull in the circle pattern from the fabric of the dress. The page turned out having retro feel with lots of stitching.
Photobucket

Cardstock and Designer Series Paper:
I used paper from the Baja Breeze and So Saffron Patterns Designer Series Paper. I have packages in almost every color. Check it out.
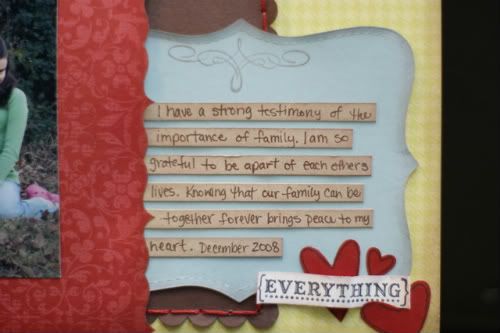
I used Chocolate Chip, Baja Breeze, Tangerine Tango cardstock.

Die Cuts with the Big Shot:
Of course, I used the Top Note (113463)!
Photobucket
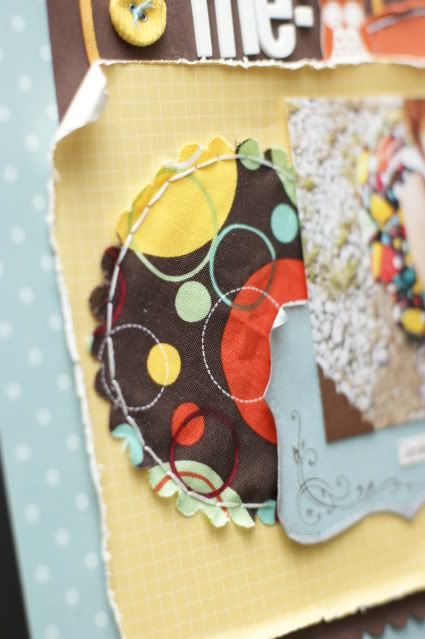
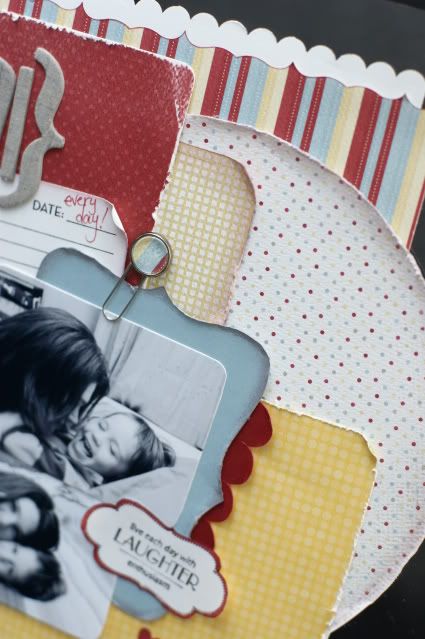
I had fun cutting the fabric with the Scallop Circle die (113468). How cool is that? I just put the fabric in the machine like I do when I use paper. Super easy and so many possibilities cutting fabric with the Big Shot.

Punches:
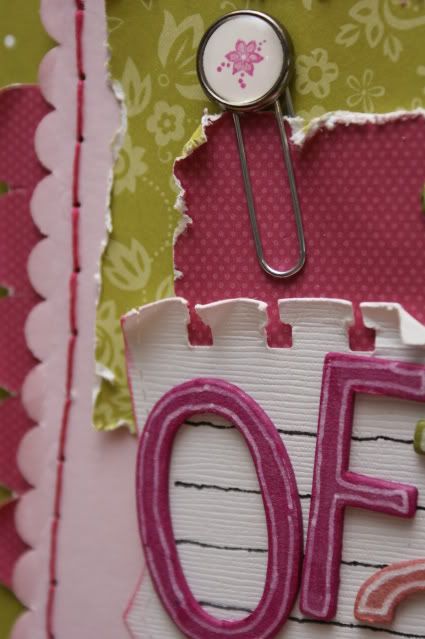
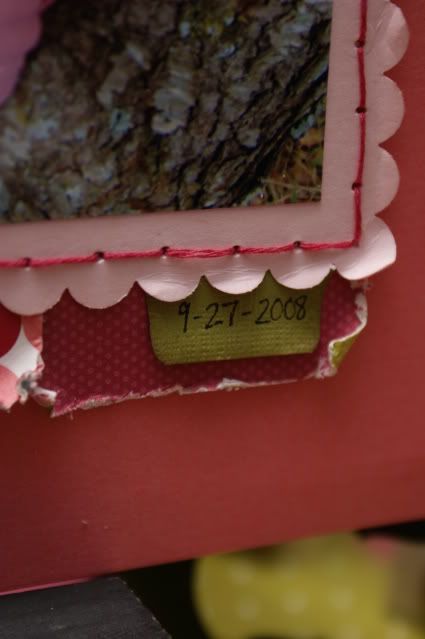
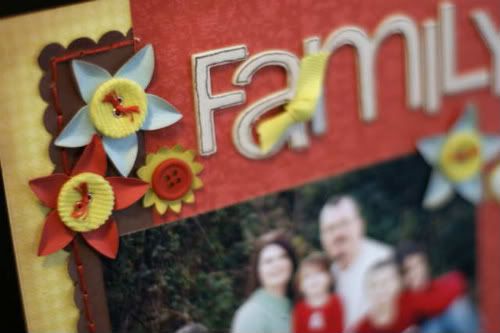
I used the Scallop Edge punch (112091) on the Chocolate Chip cardstock.
Photobucket
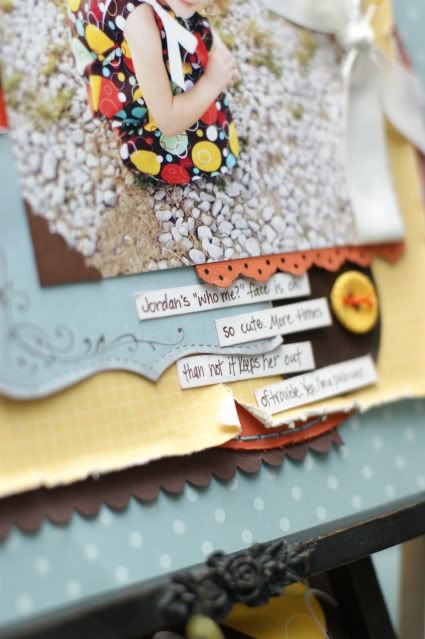
I punched a scrap of Tangerine Tango with the new Eyelet Border punch (113692) and slipped it up under the picture for a little pop of color.
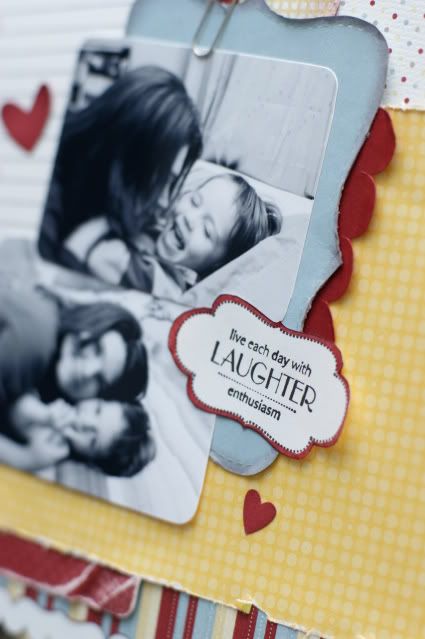
I used the Scallop Square punch (112081) and then cut it into a photo corner.

Stamps:
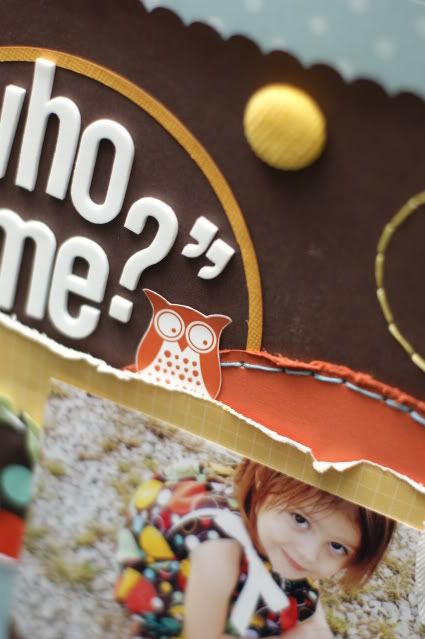
I used the "a little Something for you" stamp from the Yummy stamp set (113782) only available during the Sale-a-bration (found on page 7 of the Sale-a-bration catalog). The swirl fits perfectly in the Top Note die cut.

Rub-ons:
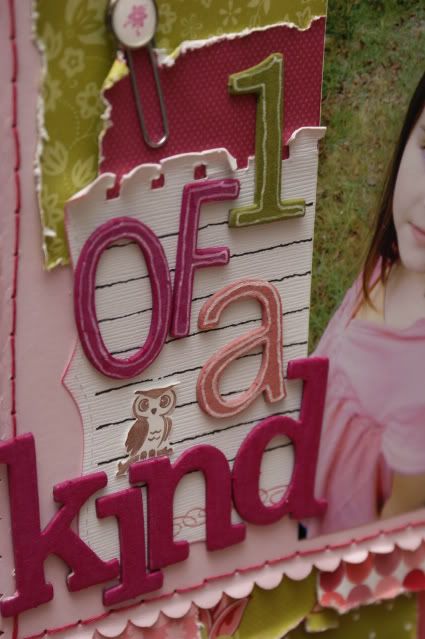
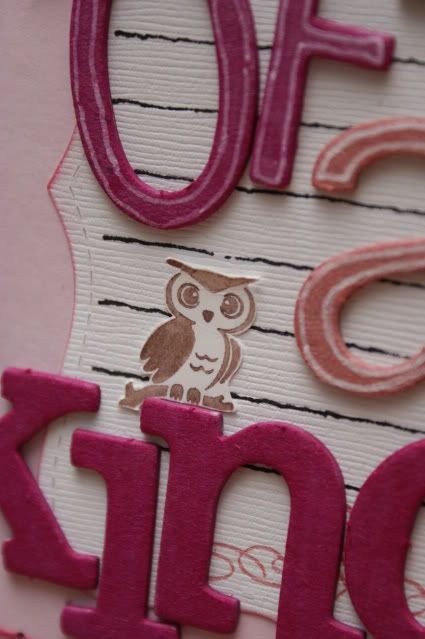
I used the little orange owl rub-on from the Bright Delights rub-on set (113887). First I rubbed it on white cardstock and cut it out. Then I tucked it behind the paper next to the title. Cute!
Photobucket

Embellishments:
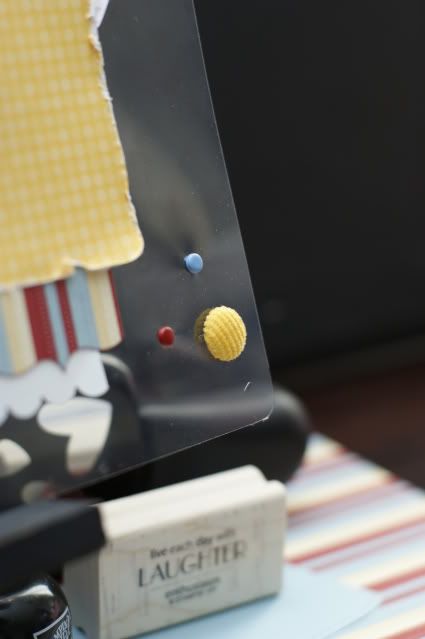
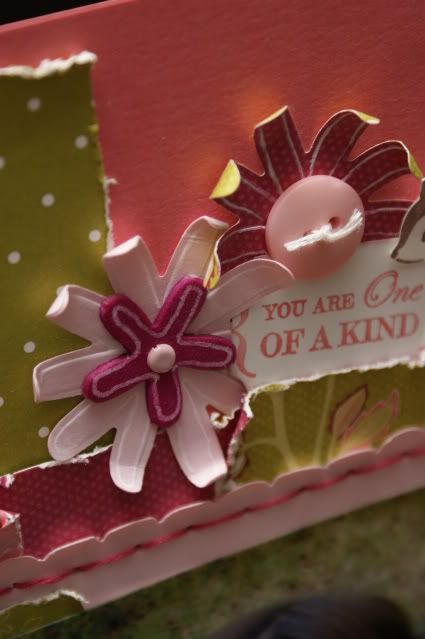
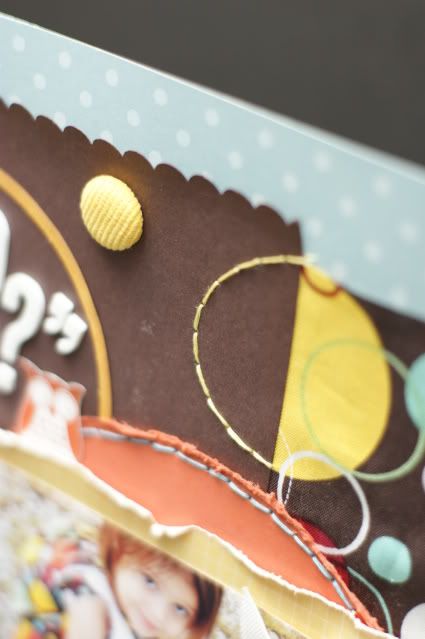
I used 4 of the Summer Sun Corduroy button/brads (114343).
The felt flower is from Flower Fusion Too Accents & Elements set (112006).
Photobucket

Non-Stampin' Up:
The letters are American Craft Thickers.
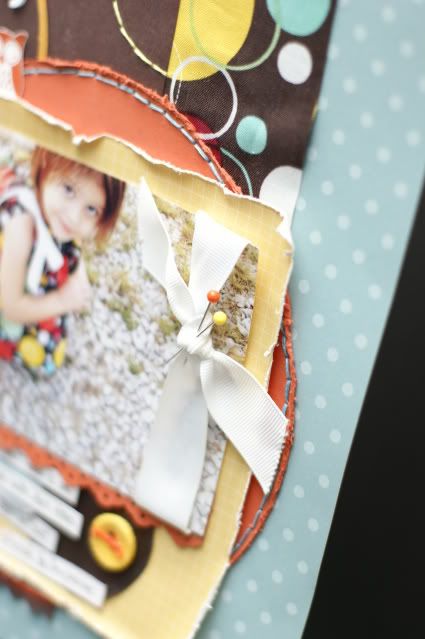
The white ribbon is from the ribbon used on the dress in the picture.
I found the fabric at Hobby Lobby.
The straight pins and embroidery thread I just had on hand.
Photobucket

Only three ladies left in the Scrap Idol! I find out Tuesday if I continue on to the last challenge. Wish me luck!

Friday, March 20, 2009

Cutting Corners

This week the Scrap Idol challenge was to create a layout without any true squared corners. We were allowed to simply use a corner rounder to rid ourselves of those pesky points. Thank goodness! That made it a little easier. Of course, I totally over thought it and worked on this layout for 2 days straight. Mostly just starring at the layout. It still doesn't feel done but I'm putting an end to the madness and calling it good, well decent anyway.
I saw a wall hanging from Hallmark with The "real" to do list and knew I had to use it as a title on a layout someday. When my friend, Trudy, let me borrow her to do list stamp I knew right away how I wanted to use it. Thanks, girl!
In April, Stampin' Up! will be offering Window Sheets which is 12x12 acrylic sheets! So cool! You can do SO many fun things with window sheets. I was really excited to try my hand at making a layout using an acrylic background. It turned out to be a little tougher than I thought. I like to fill every nook and cranny with paper or an embellishment but I wanted the acrylic to show or what was the point, right. So here's how it turned out...
Photobucket
Not sure I love it yet but I do like how having a clear background makes all of the other fun edges pop. Of course, I wanted to stitch on it but never really found the perfect spot. My husband says not every layout needs stitching. Silly man.

Paper...
I mostly used paper from the Sweet Slumber speciality paper pack (114037). This new specialty paper is thicker than cardstock! I had fun crinkling and sanding the red paper.
I also used a scrap peice of designer paper from the Good Morning Sunshine pack (113966).

Die Cuts with the Big Shot...
Umm...yeah...I used the Top Note die (113463). It's just so perfect on any project! I'll try NOT to use it on my next layout, lol. That would be a tough challenge for me.

Punches...
Lots of punches!
I used a corner rounder (109047) on every corner!
I used the Slit punch (104388) to create the large scallops.
I used the Scallop Edge punch (112091) on the white cardstock.
To create the funky edge on the striped paper I used the Curly Label punch (112966) side by side.
Photobucket
On the word 'my' I used the Word Window punch (105090) so there were no squared edges, even on my little strip.
I used the Spiral punch (108341) on the To Do List. I checked the little square holes on the punch and they have rounded corners! Wouldn't want to get disqualified.
Poking off the edge I used the Round Tab punch (108340) to make a file tab. I cut off the round part and used an old SU! rub-on for the "to do."
I punched a couple of hearts using the Heart to Heart punch (113694).
For the Build-a-brad paper clip I used the 1/2 inch circle punch (104390) for the center.

Chipboard...
I used letters from the Loads of Letters set (112084). You really do get a load of letters in a variety of fonts plus lots of cute flowers, hearts, and other stuff so one package goes a long way.
Photobucket

Stamps...
It's a Plan stamp (111658) is HUGE and double sided. You get a to do list and a calendar all in one. Awesome!
Photobucket
The quote is from the Sweet Serendipity set (113626). Great set.
I framed the quote with a stamp from Frames with a Flourish (113496). I seriously use this set all of the time!

Embellishments...
I made my own paper clip embellie again. So easy and matches perfectly to my projects! I used the Build-a-brad kit (109128) then attach the brad to a regular ol' paper clip. Easy peasy.
I am totally loving the Corduroy Button and Brad set (114343)! The texture is so cool.
Photobucket

Non-Stampin' Up!...
Brads are just brads I've collected over the years.
The letters for "my" are from G Studios.

Competition is getting tougher as the weeks go on. I'll find out if I get booted on Tuesday!

Just a reminder...
Sale-a-bration ends on the 31st! Get your orders in before then to earn your free stamps, paper, or ribbon! The items in the Sale-a-bration catalog are never offered again so get them while you can. I can take orders over the phone, through email, or you can shop at my online store 24/7! Click here to visit my online store or for my contact info.

Hope you have a fun filled weekend!

Wednesday, March 18, 2009

Not Your Momma's Stampin' Up!

I like to show at my workshops and club meetings that you can use your Stampin' Up products in more than just paper crafting. I like to think outside of the card!

Here's a vase I altered with rub-ons from the Bright Delights rub-on set (113887). I love this rub-on set. The color and theme are awesome! Love the owls, the pear, the tree, everything.
Photobucket
Using the same rub-on set, my sister altered this mug at the last workshop. LOVE it!
Photobucket
The other ladies at the workshop enjoyed making and taking home a super cute mug! Thanks for coming to the workshop. It was so much fun!

Sunday, March 15, 2009

Scrap Idol - Sketch Challenge

This week for scrap idol we had to use a sketch from pencil lines sketch blog. Plus use 2 of these techniques-stitching, distressing, stamping, paper piecing, painting, or paper tearing. I stamped (of course), distressed, and hand stitched, as usual.
Photobucket
My week was super busy so I didn't even get started on my layout until about 9 pm Saturday night and the pages are due by Sunday at midnight. If you know how long it takes me to scrap a page then you know this was tough for me.
Here's the result...
Photobucket

Cardstock and Designer Series Paper:
I used some scraps from the Pink Flamingo paper pack (113976).
I also used the Raspberry Tart paper pack (113975). Love those pinks and greens!
The Kiwi Kiss with the white dots and the flower pattern are from the Kiwi Kiss Pattern designer series paper pack (112161).
I used Kiwi Kiss, Cameo Coral, and Pink Pirouette cardstock to coordinate with the designer series paper.

Die Cuts from the Big Shot:
Yep, you guessed it, I used the Top Note die (113463). It's awesome! Did you notice it hidden under the title?
I also used a different flower this time. I used the Flower Embosslits die (114528) to create my large flowers on this layout. The embosslits are really neat. They cut and emboss at the same time!
Photobucket

Punches:
To create my little green flower I used the Boho Blossoms punch (110711).
I used the Scallop Edge punch (112091) to edge the Pink Pirouette cardstock.
Photobucket
I used the Slit punch (104388) to make the scallop edge on the Rose Red strip poking out on the left side.
TIP: Punch the Slit punch side by side to create a scallop edge.
To make my Top Note shape look like it was torn out of a notebook I used the Spiral punch (108341) and the roughed it up a bit.
TIP: To make the Spiral punch edge look torn from a book simply stick your scissors in the square wholes and pull out through the slits a few times.
I wrote the date on a tab punched with the Round Tab punch (108340).
Photobucket

Chipboard:
I used a variety of On Board chipboard letters all from the Loads of Letters set (112084). It really does come with loads of letters. With 3 sheets of chipboard, each with a different design and font, including multiple letters, you get plenty to use to create great titles on your layouts and projects. The chipboard flower center used in the top right corner also came from Loads of Letters chipboard set.
Photobucket
The number 1 came from On Board Timeless Type set (112083) which is the only chipboard set from Stampin' Up! with numbers.
TIP: To color the chipboard I simlpy colored over them a couple of times with my Stampin' Write Markers (105541) in colors to match. Love my markers!

Stamps:
"You are One of a Kind" stamp at the top right is from One of a Kind (113624).
Photobucket
At the bottom of the Top Note die cut I used the swirly stamp from Frames with a Flourish (113496). This set is so versitle I use it almost every page.
I also used an oldie but a goodie. I used the old journaling block stamp on the Top Note die cut.
Photobucket
You get a sneak peek! The adorable deer and owl used on my layout will be available to order April 1st. No fooling! This set is so sweet. The cutest little woodland critters I've seen in a long time. In this set you get a tree, bunny, deer, and owl. At only $14.95 you have got to add it to your wishlist! You can find this set and lots of other fun new products in the new Mini Catalog coming out April 1st!

Embellishments:
I made my own paper clip embellishment! I used the Build-a-brad kit (109108) and then attached the brad to a regular paper clip. Ta da! Cool, huh?
Photobucket

Non-stampin' Up:
The buttons are from Wal-Mart.
Embroidery floss probably from Wal-Mart. I've had it in my stash since my 12 yo was a baby!

I'm nervous about being voted out this week. The other ladies really rocked this sketch and their pages look great. Wish me luck! I find out Tuesday if it's my turn to go.

Don't foget to send your orders in before the end of the month if you want to earn free Sal-a-bration goodies. The month will be over before you know it and the items in the Sal-a-bration catalog will never be offered again!

Wednesday, March 11, 2009

Comment Rewards Prize...

Throughout the month every time you leave a comment on my blog you will be entered into a monthly drawing for some wonderful Stampin' Up! goodies. Just a little reward for taking your time to make my day.

Melissa, creator of the Ribbon Ring, has generously donated awesome jumbo ribbon rings. The jumbo ribbon tags hold ribbons up to 2" wide or multiple ribbons can be hung on each tag. Check out her site at Ribbon Ring. This month the winner will receive 2 yards of Stampin' Up ribbon and 10 ribbon ring tags. Now that's a sweet prize!
Photobucket

I've really enjoyed reading every one's comments. Thanks so much!
The next drawing will be at the beginning of April. So keep those comments coming.

Saturday, March 7, 2009

Ad Challege...

This week for the Scrap Idol challenge we were told to use this ad as inspiration for our layout...
Photobucket
When I first saw the ad I thought it was wonderful and thought it would be easy to create a layout using it as inspiration. That was until I started working on it, then I just kept getting frustrated! It literally took all week to finally get a page I like out of it. I cut up and ruined 2 pieces of designer series paper in the process. So sad. I'll keep it all in my scrap pile and hope I can use them somehow, sometime. I think my hang up was my determination to use a certain peice of designer series paper from the Flamingo pack. It had sun rays and reminded me of the ad. The difficult part for me, I don't really like using yellow or pink. They aren't "my colors" - green and blue, lol. In the end, the colors grew on me and the page turned out to be bright and fun. A perfect SUNSHINE page! Don't you think?

Deciding to stitch the sun rays was pretty scrary. Once you stitch on a page there is no going back and that was my last salvagable peice of sun ray paper. So I just held my breath and hoped for the best! As I was stitching there was only the sun ray paper and the stitching on the page and it had an oriental feel, lol. Made me think, the rising sun, or something. When I finally finished the stitching and put everything in it's place I really liked the pop the stitched lines gave the rays. Very sunshiney!


Paper and Cardstock...
I used the sun ray paper from Pink Flamingo (113976). A really fun paper pack. Reminds me alot of Sasafrass Lass paper.
The yellow monochramatic dot paper is from Good Morning Sunshine (113966). You know how much I love that paper pack!
I used Tempting Turquoise textured cardstock, Cameo Coral cardstock, Summer Sun cardstock, and Whisper White cardstock.

Die Cuts...
Yeah, I used the Top Note (113463) die again. Lovin' it!

Another Crafty Cutter...
Circle Scissor Plus (112530) is an easy way to cut (and even draw) perfect circles everytime!
Adjusts to make circles from 1" to 6".
Photobucket
Punches...
Of course, I used lots of punches. They are awesome!
I used the Scallop Edge (112091) punch on the Cameo Coral cardstock.


I used the 5-Petal Flower (109041) punch and the Boho Blossoms (110711) punch for my flowers.

Chipboard...
I used the adorable little bird and tree limb from So Tweet (113893) chipboard pack. I used my Stampin' Write Markers to color everything except the bird's beak. I used a tiny triangle cut from Summer Sun cardstock for the beak.
The letters used for "sunshine" are from Timeless Type (112083). Includes 3 sheets of 12” x 12” chipboard, each with a different design and font. Multiple letters (both upper and lower case) and numbers included to make creating easier. I painted the chipboard with a white paint pen. Once dry, I traced the letters with my Summer Sun Stampin' Write Marker.
Photobucket

Stamps...
I used the rectangle frame from Frames with a Flourish (113496) to frame "hello". One of my favorite and most used sets!

Non-Stampin' Up...
The brads are some old brads I've had in my stash forever from Hobby Lobby by Spare Parts. The buttons are from Wal-Mart. The thread is from a friendship bracelet kit (remember those?) I found in the $1 spot at Target last summer. The foam letters used for "hello" are Thickers by American Crafts, also from Hobby Lobby.

Journaling...
I almost forgot to share.
"This picture makes me smile. Jordan's face expresses how we all feel about Spring and the warm sun shining again. Hello, sunshine, you've been missed. Welcome back!"

I hope this fun layout put a smile on your face. :) I encourage you to create a layout using this ad as inspiration. I'd love to see it! So if you do try it out post a link to your layout in my comments.

All the little numbers beside the products I used are the item numbers, just in case you were wondering or wanted to order something I mentioned. You can order from my online store or by emailing me (r.ricks@mchsi.com)a list of the items you'd like to order. You can also click on the highlighted words to learn more about those products.

I will be posting this month's Comment Rewards prize soon. You will want a chance to win this, I'm sure! So go ahead, make my day. Leave a comment and you could win a prize.

Happy Weekend! I hope yours is as warm and beautiful outside as ours.

Wednesday, March 4, 2009

Winner...

So I was going to take a video of my daughter picking the winner but the batteries were dead so I snapped a few pictures.


And the winner is...


Natalie P.

Thanks to everyone that played along and helped spread the word about my blog! Comments make my day! I understand that leaving a comment takes time so I'm starting something called Comment Rewards here on my blog. Everytime you leave a comment on my blog you will be entered into a monthly drawing for some wonderful Stampin' Up! goodies. Just a little reward for taking your time to make my day. Thought I'd share that happy feeling. So when you stop by to take a peek at my blog take a minute of your time to share your thoughts and you could win a prize. How fun is that?
The next drawing will be at the begining of April. I'll post a picture of the prize soon.
Have a happy Wednesday.

Monday, March 2, 2009

Sneak Peek...

Ready to get started on your Easter projects?
Stampin' Up is making the following products available for customer purchase beginning March 1. (Wow, it's March already!) Although the Occasions Mini Catalog is not available until April 1, they wanted to give you time to create your Easter projects using the adorable new Easter stamp sets and accessories.
Aren't the bunnies cute? I just love the little chick balancing eggs on his head!
Eight Great Greeting has a little bit of everything.
The duck in Wagon Full of Fun is adorable as well. So many cute things!
Click here to place your order online 24/7.


Also, you saw it as a sneak peek in Stampin' Up!'s Spring/Summer 2009 Idea Book and Catalog (p. 202). Starting today, Stampin' Up!'s exclusive Manhattan Flower Textured Impressions Die (114517) is available to purchase ($7.95).

Exclusive Stampin' Up! design
Coordinates with Stampin' Up!'s Manhattan Collection (pg.9 of the Spring/Summer Catalog)-
Fifth Avenue Floral
Urban Oasis Designer Series Paper
Use with standard cutting pads and a Big Shot
Creates a deep, bold embossed image
Does not cut
Clear design
Sized for a standard card front

There are so many amazing promotions right now you can combine and take advantage of these promotions when you order online or at my next Stampin' Up get together!

Stampin' Up!'s Occasions Mini Pre-Order (above)

Sale-A-Bration

Free Catalog Promotion (online or when you host a party through me)

Have a lovely Monday!

Sunday, March 1, 2009

Family...

Photobucket

A group of online friends are holding a Scrap Idol. For 6 weeks the participants are given a challenge each week. We then have 5 days to complete and post a layout created following the requirements of that week's challenge.
This week we had to:
1) Use at least 2 pictures, but no more than 3
2) Use at least 2 different pattern papers
3) Use at least 1 piece of cardstock
4) You must use ribbon
5) Use at lest 5 buttons
6) You must use ink on your layout
Nothing too crazy this week. Wish me luck. Three people will be voted off Tuesday!

Paper and Cardstock...
I used a few the "In Colors" on this layout - Riding Hood Red, Baja Breeze, Kiwi Kiss.
The Kiwi Kiss paper is from Urban Oasis Designer Series Paper pack.
The Riding Hood Red paper is from Bella Rose Designer Series Paper pack.

Punches...
I think it is becoming obvious that I LOVE punches!
I used the Scallop Edge punch around the Chocolate Chip cardstock. It was tricky to get the corners all matched up but after a little trial and error it worked out. Thank goodness parts were covered though, lol.
To create a funky edge on the Riding Hood Red paper I used the Curly Label punch.
Photobucket
I simply punched each punch side-by-side. Fun, huh?
At the very bottom right corner I have a bunch of the little hearts punched using the Heart to Heart punch. Photobucket
I really love how it punches a variety of sizes and shapes at once. Perfect for using in a collage!
I used two different punches for the flowers. The large flower is the Five Petal Flower punch. To give these flowers more punch (LOL) I pinched the points of the petals together.
Photobucket
The smaller flowers are punched using the Boho Blossoms punch. This punch creates 3 small blossoms at once!

Chipboard...
I used the On Board Loads of Letters set for my title. Then I used my Chocolate Chip Stampin' Write marker to trace around the edges and tied a scrap of ribbon to the 'a' to finish it off.

Awesome Accesories...
Photobucket
I feel in love the these corduroy buttons the first time I saw them in the catalog. These are in Kiwi Kiss. You receive 24 buttons per container; 8 each of the following: 3/4" circle with holes, 3/4" circle with prong attachment, 1/2" circle with prong attachment. That gives you plenty to play with!

Die Cuts...
Of course, I used the Top Note Die! Love it. I thought it worked perfectly as a journaling spot.
Photobucket

Stamps...
I used the little swirly stamp from the Frames with a Flourish set. It fit wonderfully in the point of the Top Note die cut.
I also used the "everything" from the Always set.

Thanks for visiting!

I'll be posting a sneak peek of the Occasions Mini Catalog tomorrow. It will be worth checking out. Stampin' Up is allowing costumers to oder certain Easter sets a full month early! The Occasions Mini catalog doesn't actually come out until April. Be sure to come back and take a look.

LinkWithin

Related Posts with Thumbnails
Disclaimer: The content in this blog is the sole responsibility of Rachel Ricks as an independent Stampin' Up! demonstrator and the use of and content of classes, services or products offered is not endorsed by Stampin' Up!

All content, including text, photographs, and concept design works, are ©Rachel Ricks. They are shared for personal/ non-commercial use and inspiration only.

Blog header and logo design © Rachel Ricks.

flash backs